 Skip to content
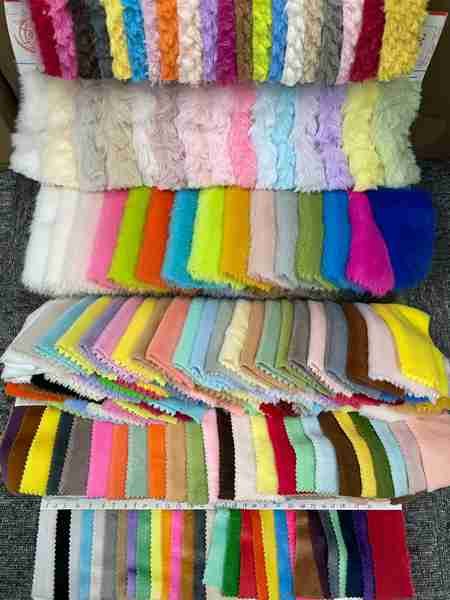
Plush Fabric Options, Handfeel Targets, and Color Matching That Holds Up in Bulk
If you’ve bought plush before, you already know the moment of truth isn’t when the sample looks cute on a desk. It’s when the first bulk carton arrives and you realize the fabric feels “a little different,” the color is “slightly off,” or the surface starts to pill after a few weeks of normal use. That’s when returns happen. That’s when reviews shift. That’s when a product that should have been an easy win turns into a quiet cost sink.
Here’s the uncomfortable part: most plush problems aren’t “factory mistakes.” They’re materials decisions that weren’t defined tightly enough. Plush is tactile, and tactile products punish vague specs. If says “soft,” one supplier hears “short-pile smooth.” Another hears “long-pile fluffy.” If sends a Pantone code and thinks the job is done, reality shows up under warehouse lighting and the shade reads warmer, cooler, or duller than expected. And if the RFQ doesn’t spell out a “handfeel target,” sampling often becomes a guessing game.
The good news is you can make plush materials predictable—without making your process slow. You just need a clear structure: choose the right fabric family for the product type, define handfeel like a measurable target, lock color matching with the right approvals (lab dips and strike-offs), and evaluate samples the way bulk will behave (not the way a photo looks on a screen).
To choose materials for custom plush toys, start by selecting the right plush fabric type (minky, velboa, sherpa, faux fur, fleece) for your product and defining a clear handfeel target (smooth, squishy, fluffy, or structured). Then lock color using physical standards and approvals like lab dips for solid dye fabrics and strike-offs for printed fabrics before bulk production. Evaluate fabric samples with seam tests, abrasion and pilling checks, and set acceptance rules to prevent shade drift and feel changes in mass production.
Below is a practical, factory-facing guide—written for who want bulk consistency, not just a pretty prototype.
What are the most common plush fabric options, and which type of fabric fits each plush product?
The most common plush fabrics include minky (polyester knit plush), velboa (short-pile faux fur), sherpa, faux fur, and fleece. The best fabric depends on your product type: smooth short-pile fabrics support clean face details and stable sewing, while longer-pile fabrics create premium fluff but can blur facial features and show shade changes with nap direction. Match fabric choice to use case—character plush, mascot plush, keychain plush, pillow plush, or functional plush.
Start with “Which fabric is softest?” That’s normal, but it’s not the best first question. A better first question is:
What kind of plush product are you making—and what will do with it?
A shelf collectible plush, a baby-safe cuddle plush, a keychain plush that gets thrown into bags, and a promotional mascot plush for events all have different needs. The fabric “winner” changes because the stress points change.
Here are the fabric families you’ll see most often:
- Minky: A plush knit fabric commonly made from polyester microfiber, known for a very soft surface and many texture options. It’s widely used in plush production and available in different weights and pile heights.
- Velboa: A very short-pile faux fur that’s soft, durable, and often used as a minky alternative in toys and costumes.
- Sherpa: A curly, fleece-like pile that reads cozy and “warm” visually.
- Faux fur: Longer pile, high visual impact, premium fluff, but more sensitive to brushing direction and face clarity.
- Fleece: Usually stable, cost-friendly, and easy to sew, but the surface look is different from premium plush piles.
Now match fabric to product type:
1) Character plush (face accuracy matters)
Choose fabrics that support clean detailing: short-pile minky or velboa. Long pile can make the face look “foggy,” especially for small eyes, tight mouth shapes, or fine outlines.
2) Mascot plush (distance viewing matters)
Mascot plush often needs a “big read” from far away: high contrast shapes, bolder embroidery, and strong silhouette. Sherpa or faux fur can work if you plan the face method correctly and accept that micro-details won’t read as clean.
3) Keychain plush (abrasion and dirt matter)
Keychains get rubbed by denim, keys, and bag interiors. You want a surface that resists roughness changes and doesn’t show wear too quickly—often short pile and tighter construction wins here.
4) Pillow plush / cuddle plush (handfeel matters most)
Here you can prioritize softness and squish. The face might be simpler, so you can choose a fabric for feel first—then select the face method that still looks clean.
5) Functional plush (modules, zippers, pockets, electronics)
If you add sound boxes, LED, zippers, straps, or pockets, you’re no longer making “just plush.” You’re making a sewn product with plush materials. That changes fabric needs: backing strength, seam stability, and how the fabric behaves around hardware.
The nap-direction reality check
One detail that surprises : the same fabric can look like two different colors depending on nap direction (pile direction). This is why bulk cutting plans matter. If pattern pieces flip direction, your plush can show shade shifts even when dye is consistent. Your material choice should include a process choice:
- Do we enforce consistent nap direction for all body panels?
- Do we allow directional variation on non-visual areas to reduce waste?
- Do we need to define “photo-proof rules” so approvals don’t get misleading images?
If a supplier doesn’t ask about nap direction on pile fabrics, that’s not automatically a deal-breaker—but it is a signal you may need to lead that part of the spec.
Which plush fabric is best: minky vs velboa vs sherpa vs faux fur and why?
Minky and velboa are often best for clean facial detail and bulk repeatability because their short pile supports crisp embroidery edges and stable seams. Velboa is typically a short-pile faux fur that’s durable and widely used for toys. Sherpa and faux fur create a fluffier premium look, but longer pile can blur faces and make color look different depending on brushing direction. “Best” depends on face complexity, wear conditions, and your consistency target.
ask “Which is best?” but in plush, “best” is usually best for this design + this channel + this price point. Let’s compare in the way actually decide—by risks and outcomes.
Fabric Comparison Table (Buyer-facing, practical)
| Fabric | Visual Look | Face Detail | Wear Resistance | Sewing Stability | Typical Risk |
|---|---|---|---|---|---|
| Short-pile minky | smooth, premium | strong | good | strong | nap-direction shade shift |
| Velboa | smooth, slightly fur-like | strong | strong | strong | can look “less fluffy” |
| Sherpa | cozy, curly | medium | medium | medium | face clarity drops on small features |
| Faux fur (long pile) | very fluffy, premium | low–medium | varies | medium | face blur, shedding, brushing direction |
| Fleece | simple, matte | medium | good | strong | may look less “plush-luxury” |
Minky vs Velboa
- Minky is often chosen for a soft premium surface and wide texture options. It’s commonly described as a polyester knit plush fabric.
- Velboa is typically described as a very short pile faux fur that is soft and durable, used in toys and stuffed animals.
From a bulk perspective, short-pile fabrics tend to:
- show embroidery edges cleaner,
- hide seam tension issues less (which is good—problems show early in sampling),
- behave more predictably in cutting and sewing.
If your plush has detailed eyes, a small mouth, or tight facial symmetry requirements, short pile is usually the safer path.
Sherpa vs Faux Fur (premium fluff vs control)
Sherpa and faux fur are the “wow” fabrics. They create that soft, fluffy, giftable look. The trade-off is control.
Longer pile tends to:
- reduce face readability for small features,
- show brushing direction differences,
- need more finishing (brushing, trimming around face),
- sometimes increase shedding risk.
That doesn’t mean “don’t use them.” It means you must plan the face method and accept the right kind of detail. Many brands use long pile successfully by:
- making eyes larger and bolder,
- using embroidery outlines stronger,
- trimming pile around the face area,
- simplifying facial art for better readability.
Price drivers should expect
Fabric pricing isn’t only about “type.” It’s often driven by:
- pile length and density,
- GSM and backing strength,
- dye stability and color lot control,
- special finishes (anti-pilling, anti-shedding),
- minimum dye quantities per colorway.
The smartest “best fabric” decision is often:
pick the fabric that your supplier can repeat reliably at scale while still matching your brand’s feel target.
So when you ask a factory “Which is best?” you’ll get better answers if you attach it to a use case:
- “Best for clean face detail and low returns on eCommerce?”
- “Best for premium shelf appeal at retail?”
- “Best for keychains that get constant abrasion?”
- “Best for soft cuddle feel while staying consistent in bulk?”
That’s how you get a useful answer instead of a generic one.
What handfeel targets should you define, and how do factories measure “softness”?
A handfeel target is a clear definition of how the plush should feel in the buyer’s hand—smooth, squishy, fluffy, or structured—supported by physical references and approval rules. Factories can’t measure “softness” from photos, so should approve handfeel using fabric swatches, stretch and bounce-back expectations, and a simple scoring system. Handfeel targets also help prevent surprises like pilling, roughness, or stiffness after normal use.
If you want fewer “it feels different than the sample” issues, you need one concept nailed early:
Handfeel is a target, not a vibe.
Handfeel is a product spec because it directly drives:
- repeat orders,
- review quality,
- returns and complaints,
- perceived value vs price.
What is a “handfeel target” in a factory-ready way?
A good handfeel target includes:
- A primary feel label (what customers will say) Examples:
- “velvet-smooth”
- “soft and dense”
- “fluffy and airy”
- “squishy / mochi-like”
- “firm structured cuddle”
- A physical reference This can be:
- a swatch you approve,
- a competitor product reference,
- a previously approved bulk product.
- A “don’t do” list Examples:
- “No roughness on belly after abrasion”
- “No stiff face patch feeling”
- “Avoid shedding lint on dark clothing”
- “Avoid crunchy sound from pile”
How do customers approve handfeel without making it complicated?
You can keep it simple with a scorecard.
Handfeel Approval Scorecard (simple, useful)
| Attribute | Notes |
|---|---|
| Surface smoothness | Does it feel silky or grabby? |
| Plush fullness | Dense pile or thin? |
| Squish / bounce-back | Does it recover shape quickly? |
| Warmth / coziness feel | Does it feel cozy or cold? |
| “Premium feel” perception | Would call it high-end? |
This isn’t “lab science.” It’s a repeatable way to avoid vague approvals.
How to prevent fabric pilling and roughness over time?
This is one of the most common post-launch problems—especially for keychain plush, bag-hanging plush, or plush used by kids daily.
Most sources agree on the basic mechanism: pilling is driven by friction, where loose fibers tangle into little balls.
So what can you do before bulk?
1) Choose a construction that resists fiber loosening
Tighter knit or more stable construction generally pills less than looser structures, and certain fiber/yarn choices change pilling behavior.
2) Identify abrasion hot spots in the design
Common pilling zones:
- under arms,
- belly area,
- chin area (rubbing on clothing),
- feet and tail (handled often),
- keychain attachment zone.
Design can reduce friction by:
- smoothing seam placement away from contact zones,
- adding protective panels in high-wear areas,
- avoiding long pile in zones that rub constantly.
3) Ask for the right tests on swatches (not just “looks soft”)
Quick checks you can request:
- rub test (hand rub + cloth rub) to see immediate fuzzing,
- pilling tendency quick check (abrasion simulation),
- wash and dry simulation (if your channel expects it).
4) Don’t over-stuff to “fake premium”
Over-stuffing can increase surface friction because the pile is stretched and rubs more aggressively. You want the right density, not maximum density.
From ’s standpoint, pilling prevention is a cost choice too. Anti-pilling finishes or higher-grade fabric options can increase cost. The point is not “always pay more.” The point is: align the fabric grade to how the product will be used.
A collector plush on a shelf has different needs than a keychain plush used every day. If your supplier asks this question upfront, they’re thinking like a partner.
How do you choose fabric specs that control quality and bulk repeatability (GSM, pile length, backing, stretch)?
Bulk repeatability depends on fabric specs: GSM (weight), pile length and density, backing strength, stretch direction, and shedding tolerance. These specs influence seam appearance, embroidery clarity, and shape stability. Should define specs in the RFQ, enforce consistent nap direction where needed, and evaluate samples with stitch tests, stretch recovery checks, and abrasion/pilling screening before approving bulk fabric.
This is where plush moves from “craft talk” to “manufacturing talk.”
Two swatches can both be called “minky,” but behave very differently in bulk if specs aren’t aligned.
Key fabric specs that matter (and what they change)
1) GSM (fabric weight)
- Higher GSM often feels denser and more premium.
- It can also be harder to sew cleanly on tight curves if not handled correctly.
- Lower GSM may feel thin and show seam tension changes more easily.
2) Pile length + pile density
- Short pile supports face clarity and cleaner embroidery edges.
- Long pile creates fluffy look but may obscure details and show brushing direction.
- Density affects perceived quality and can influence pilling tendency.
3) Backing strength
Backing is a huge deal for bulk. Weak backing can lead to:
- seam distortion,
- shape collapse,
- “wavy” sewing appearance,
- increased risk around accessories.
4) Stretch direction and recovery
Plush knits can stretch differently in different directions. If pattern pieces aren’t oriented consistently, your finished size and shape can drift.
5) Shedding tolerance and surface stability
Some fabrics shed more, some “fuzz” faster, and some keep their surface better under friction. This ties directly to returns and customer satisfaction.
How specs affect seam appearance, embroidery clarity, and deformation
Here’s the buyer-facing reality:
- A stretchy fabric with weak backing may look great as a soft sample, but drift in bulk if operators vary seam tension.
- A dense short-pile fabric may show seams more clearly, which forces the factory to keep workmanship clean (good for consistency).
- A long-pile fabric may hide small seam flaws, but may create bigger variation in face readability.
So “best spec” is not only aesthetic; it’s about how you want bulk to behave.
How to evaluate fabric samples before bulk?
This is one of the three subtopics you asked for, and it’s worth doing properly because it prevents expensive surprises.
Here’s a practical evaluation checklist you can run in-house and with your supplier.
Fabric Sample Evaluation Checklist (Before Bulk)
| Check | How to do it | Why it matters |
|---|---|---|
| Stretch & recovery | stretch gently, release, compare | prevents shape drift |
| Seam puckering test | stitch a curved seam panel | shows sewing stability |
| Needle mark risk | inspect under light after stitching | prevents “pinholes” look |
| Rub test | rub with cloth 30–60 seconds | early fuzz/pilling signal |
| Brush direction check | brush pile both ways | predicts shade shift |
| Embroidery edge clarity | test small eye outline | face readability test |
When skip this, they often approve a swatch that feels great—then discover bulk changes once sewing tension, batch differences, and handling enter the picture.
Your best move is to request stitch-test swatches. That means the factory sews your likely seam types and face methods on the actual fabric option, so you see how it behaves in real construction.
If your supplier says “we don’t do stitch tests,” you can still do basic checks, but you lose a valuable early warning system.
How does color matching work for custom plush (Pantone, lab dips, strike-offs), and how long does it take?
Color matching for plush requires physical approvals because fabric, pile direction, and lighting change how colors appear. Pantone codes are useful targets, but should approve color through lab dips for solid-dyed fabrics and strike-offs for printed fabrics before bulk production. Lab dips are small dyed swatches submitted for approval, while strike-offs are printed samples made on actual production fabric. Timelines vary by approval rounds and dye-house scheduling.
If you’ve ever said, “Why doesn’t the fabric match the Pantone?” you’re not alone.
Pantone is a helpful target, but plush is not a flat ink on paper. Plush is:
- fiber + dye method,
- pile direction,
- texture + light reflection,
- and sometimes printing methods on top.
So the factory-grade approach is: Pantone + physical approval + controlled production lots.
Pantone vs physical swatch: which is better for plush?
Pantone is great for communicating intent, but for plush:
- pile reflects light differently,
- surface texture shifts perception,
- nap direction can create shade swings.
So physical swatches matter because they represent how your product will look in real life.
What is a lab dip, and when should you request it?
A lab dip is commonly defined as a small sample of fabric dyed to match a specific color standard, sent for approval before bulk dyeing.
You should request lab dips when:
- you need custom-dyed solid colors,
- your brand color is non-negotiable,
- you’re launching a new SKU family and want reorder stability.
What is a strike-off, and when do you need it?
A strike-off is commonly described as a printed fabric sample submitted for print color approval—ideally using actual production fabric and base color.
You need strike-offs when:
- you print patterns,
- you have gradients or illustration-style eyes,
- you use all-over print plush fabrics,
- you want to confirm how print looks on a pile surface.
How long does color matching take?
The honest answer: it depends on:
- how many approval rounds you need,
- dye-house schedule,
- minimum dye quantity rules,
- how quickly your team signs off.
Common causes of delay:
- approvals made from phone photos only,
- no defined viewing light standard,
- unclear tolerance rules (“close enough” later becomes an argument),
- last-minute color changes after sampling.
A practical color-matching workflow looks like this:
- confirm target (Pantone or physical reference)
- request lab dip (solid dye) or strike-off (print)
- approve under defined lighting
- archive master swatch for incoming checks
- enforce nap direction rules in cutting
If your supplier offers this structure, you’re not just buying fabric—you’re buying reorder control.
What makes color go wrong in bulk production, and how do you prevent shade drift (dye lots, lighting, tolerance)?

Bulk color problems usually come from dye-lot variation, inconsistent nap direction, and approvals made under different lighting conditions. Prevent shade drift by using a master swatch, defining acceptable tolerance, viewing colors under consistent light, and checking incoming fabric before cutting. should also set rules for photo approvals and require consistent pile direction on visible panels to avoid “same dye, different look” issues.
Let’s name the three most common reasons bulk color goes wrong—even when suppliers aren’t “trying to cut corners.”
1) Dye lot variation
Even with good suppliers, separate dye lots can vary slightly. The fix is process, not hope:
- approve and archive a master swatch,
- compare incoming fabric to the master swatch before cutting,
- keep lots consistent within a single order whenever possible.
2) Lighting differences (the silent killer)
Colors don’t look the same under:
- daylight,
- warm indoor lighting,
- warehouse fluorescent,
- phone camera auto-correction.
If approvals happen under random lighting, bulk disputes are almost guaranteed.
A simple buyer-friendly rule:
- approve colors under a defined light condition (or light box),
- take reference photos under the same condition,
- keep the master swatch as the final reference.
3) Nap direction and surface reflection
Pile fabrics reflect light differently depending on direction. Two pieces from the same lot can look different if cut in opposite direction. This is why cutting rules matter.
Often choose a balanced policy:
- enforce consistent nap direction on all visible panels,
- allow flexibility on internal panels to reduce waste (if it doesn’t affect appearance),
- define which panels are “visual priority panels.”
How to write -friendly color acceptance rule
Try something like:
- “Approved color is based on the physical master swatch under standard indoor white lighting. Incoming bulk fabric must match the master swatch within acceptable tolerance. If nap direction changes shade appearance, all visible panels must follow the same nap direction as the approved sample.”
This kind of language reduces arguments later because it defines:
- what reference wins,
- how to view it,
- what to do about nap direction.
Also, don’t underestimate the value of a “photo rule”:
- photos should include the master swatch in frame,
- photos should be taken under consistent light,
- no heavy filters.
These tiny rules prevent big disputes.
What materials and fabrics are safest for plush toys, and which tests matter for your target market?
Material safety requirements depend on where you sell and the age grading of the product. In the U.S., toy safety rules often relate to ASTM F963 and may require third-party testing for applicable sections. In the EU, toy safety obligations relate to the Toy Safety Directive and EN 71 testing practices used across the industry. should plan safety and compliance early because materials, trims, and attachments influence test outcomes.
This section matters, but it also needs the right tone: you don’t need to turn your plush project into legal paperwork, but you do need to be aware of how materials choices connect to safety expectations.
The practical view: materials + attachments drive safety risk
For plush, typical risk areas include:
- small parts (eyes, noses, accessories),
- attachment strength (keychain loops, straps),
- seams that can open under pull,
- fabrics that shed excessively,
- chemical restrictions (varies by market),
- flammability expectations (market dependent).
U.S. baseline: ASTM F963 and certification workflow
CPSC guidance explains that ASTM F963 covers a wide variety of toy safety requirements, and not all sections apply to every toy— and firms must identify what applies to their product.
There is also a regulatory history around revisions becoming mandatory toy standards (for example, references to ASTM F963-23 becoming mandatory are discussed in Federal Register coverage).
For , the takeaway is simple:
- don’t assume “one test fits all,”
- align safety planning to your product features (age grade, attachments, electronics, etc.),
- and talk about compliance early, before bulk.
If your product is considered a children’s product in the U.S., certification paperwork like a Children’s Product Certificate (CPC) has required elements listed by CPSC.
(Your importer/brand side usually handles the final documentation, but factory readiness matters because materials and workmanship must support compliance.)
EU baseline: Toy Safety Directive and EN 71 testing context
Intertek describes the EU Toy Safety Directive as a legislative framework to ensure toys sold in the EU are safe, and notes industry direction toward a Toy Safety Regulation replacing it in the future.
For many , EN 71 testing is the practical language used in supplier conversations for EU-bound toys (with different parts covering different risks, depending on product).
What this means for materials and fabrics
From a materials standpoint, this typically pushes to:
- avoid unstable shedding materials for children’s products,
- ensure dyes and prints are handled with proper controls,
- confirm attachment methods for accessories,
- document materials (BOM and traceability).
A ready factory won’t guess here. It will ask:
- Where will you sell (US/EU/UK/other)?
- What’s the target age grade?
- Are there small parts, magnets, or electronics?
- What packaging and labels are expected?
This isn’t “being difficult.” It’s the factory protecting your launch.
Which filling and inner materials pair best with each plush fabric and why it changes handfeel and shape ?
Handfeel and shape come from a fabric + filling system, not fabric alone. Standard PP cotton gives a classic plush feel, high-resilience filling improves bounce-back and shape recovery, and weighted beads create premium “heft” when designed safely. Fabric stretch and backing strength affect how stuffing feels and how the plush holds posture over time. Choose filling based on use case—collectible shelf plush, cuddle plush, keychain plush, or functional plush with modules.
often argue about fabric first, then realize later the sample feels “wrong” because filling wasn’t defined. The truth:
Fabric sets the surface. Filling sets the body.
Common filling options and what they do
1) Standard PP cotton (classic)
- soft, familiar, cost-friendly
- works for most plush shapes
- can clump if low-grade or over-compressed in shipping
2) High-resilience filling
- better bounce-back
- keeps shape better in storage and after squeezing
- often used when you want a premium feel and less “flat after shipping” risk
3) Weighted beads (premium heft)
- creates calming “weight” and a higher perceived value
- must be designed properly (inner bag control, seam strength, market expectations)
- best for base-weighted plush that needs to sit well
Fabric + filling pairing logic?
Here’s a simple way to think:
- Stretchy plush fabric + controlled stuffing density = squishy feel
- Dense short-pile fabric + higher resilience filling = premium smooth + shape stability
- Long pile fabric + soft stuffing = very cuddly but can look messy if structure isn’t controlled
- Keychain plush often needs tighter stuffing + stable backing to prevent shape collapse
Prevent clumping, uneven stuffing, and long-term collapse
A lot of “bad feel after shipping” comes from compression and poor recovery. A few practical fixes:
- Choose filling grade based on channel reality (long sea shipping vs quick domestic).
- Define target weight range so bulk doesn’t drift.
- Use internal structure for shapes that must stand or sit.
- For weighted products, specify bead placement zones and inner bag requirements.
Why this matters
If your plush is sold online, the buyer’s first touch happens at unboxing. If the plush feels flat, lumpy, or inconsistent, you get:
- lower review scores,
- returns,
- “not as described” complaints even when the product looks correct.
So pairing fabric and filling is not “nice to have.” It’s part of your customer experience design.
What should you ask a plush fabric manufacturer or factory for samples, and how do you approve them?
Should request a sample set that includes fabric swatches, lab dips or strike-offs (when relevant), stitch-test panels, and basic abrasion or pilling screening—then approve using a written checklist. Approvals should cover handfeel, color under defined light, stretch and seam behavior, embroidery clarity, and wear risk. Sign-off should be shared across product, sourcing, and QA to prevent “approved by one person, rejected later” delays.
If you want bulk to match the sample, you must approve materials like bulk will behave—not like a clean swatch on a desk.
What sample set should a factory provide for approvals?
At minimum, ask for:
- Fabric swatches (all candidate options, labeled with spec notes if possible)
- Color approvals:
- lab dips for solid dye fabrics
- strike-offs for printed fabrics
- Stitch-test panels (seams and embroidery on the actual fabric)
- Wear screening (quick rub tests, early pilling signal checks)
How to evaluate fabric samples before bulk (a structured way)
This is one of your required subtopics, so here’s a clean workflow you can use.
Step 1: Decide what the fabric must achieve
- face clarity or fluff priority?
- shelf collectible or daily-use keychain?
- premium handfeel or cost target?
Step 2: Run the same checklist every time
Use a standard checklist so approvals don’t change based on mood.
Step 3: Approve under the same conditions
Colors should be checked under consistent lighting with physical standards.
Step 4: Record the approval
Archive:
- the approved swatch,
- the approval date,
- version label (if part of a sample program),
- and who approved it.
Who should sign off internally?
In programs, delays often come from internal misalignment:
- product approves softness,
- brand approves look,
- QA rejects because of wear risk or seam behavior,
- sourcing worries about lead time.
A simple rule:
- product + brand + QA should align before bulk.
If you’re small and one person wears multiple hats, that’s fine—just keep the checklist consistent.
How to compare sample vs bulk risk (the uncomfortable truth)
A lot of samples look great because:
- they are sewn by top operators,
- they use carefully handled swatches,
- they don’t face bulk cutting constraints,
- they aren’t rubbed by shipping and daily use yet.
Your goal is to approve materials that can survive:
- batch variation,
- multiple operators,
- shipping compression,
- real customer handling.
That’s why stitch tests and abrasion screening matter. They don’t slow you down; they prevent rework later.
What is the best way to control fabric cost and lead time (price vs quality vs timeline), and how do you quote it correctly?
To control cost and lead time, reduce unnecessary colorways, simplify fabric families, and align accessories and packaging to the channel. Fabric price is driven by pile density/length, GSM, dye complexity, and minimum dye quantities per color. Accessories can change cost more than fabric—especially embroidery stitch count, custom hardware, zippers, sound/LED modules, and retail packaging. Accurate quotes require clear SKU splits, color count, accessories list, packaging level, destination market, and timeline.
love “best price,” but the real question is:
How do I hit my target cost without creating quality or timeline risk?
Here are the levers you actually control.
1: Color count and colorway strategy
Each additional colorway can add:
- dye approvals,
- inventory complexity,
- higher minimums,
- more mismatch risk.
If you’re testing the market:
- start with fewer core colors,
- expand after you’ve proven demand.
2: Fabric family simplification
Using five different fabric types in one plush can look premium, but it increases:
- sourcing complexity,
- mismatch risk,
- lead time dependencies.
Sometimes a “smart premium” design uses:
- one main plush fabric,
- one contrast fabric for details,
- and a stable face panel fabric.
3: Packaging level
Packaging changes both unit cost and timeline. Decide early:
- polybag + label vs color box vs display carton.
What accessories affect cost the most in plush?
This is your required subtopic, and it’s a big one.
In plush quoting, accessories can swing cost more than fabric because they add labor steps, sourcing constraints, and QC risks.
High-impact cost drivers often include:
Embroidery stitch count (especially faces)
- More stitches = more machine time.
- Dense embroidery can require stabilizers and extra handling.
Custom hardware
- custom zipper pulls, custom metal plates, special clips
- mold/setup costs may apply, plus longer sourcing lead time
Zippers and functional components
- pockets and zippers add sewing complexity and reinforcement needs
Electronics/modules
- sound boxes, recordable modules, LED
- adds assembly steps and compliance considerations depending on market
Magnets or special inserts
- adds design constraints and often more careful risk management
Packaging upgrades
- color boxes, inserts, window boxes, blind-box display packaging
- can add printing setup, dielines, and approval rounds
Accessories Cost Impact Table (practical)
| Accessory / Feature | Cost Impact | Why it changes the quote |
|---|---|---|
| High stitch-count embroidery | High | machine time + handling |
| Custom metal hardware | High | tooling + sourcing lead time |
| Zippers/pockets | Medium–High | extra sewing steps + reinforcement |
| Sound/LED modules | High | assembly + sourcing + risk control |
| Keychain rings/clasps | Medium | reinforcement and pull strength needs |
| Retail color box + insert | Medium–High | printing + dieline approvals |
What info does a factory need to quote accurately?
If you want fewer re-quotes, include:
- product type + size
- fabric type preference + color count
- face method (embroidery/printing/hybrid)
- accessories list (with photos/links if possible)
- packaging level
- quantity + SKU split
- destination market + any compliance expectations
- target timeline
A quote is only as accurate as the scope definition. If scope changes, price changes. That’s not “supplier games.” That’s manufacturing reality.
What makes a plush factory for ready materials management (traceability, consistency, and reorders)?
A ready plush factory manages materials with documentation and repeatability: approved swatch libraries, locked fabric specs, BOM control, dye-lot tracking, incoming checks, and archived approval records. It uses clear communication (recap summaries, version labels, and photo proof) to prevent misinterpretation. These systems reduce reorder mismatch and help bulk products match the approved sample in both color and handfeel.
A lot of learn this the hard way: the first order can be “fine,” but the reorder is where supplier maturity shows.
What looks like in materials management
1) Approved swatch library
- the factory retains the approved swatch reference for reorders
- the buyer retains the same on their side
2) Locked fabric spec
Not “minky,” but:
- pile length range,
- GSM range,
- backing strength expectation,
- color standard reference.
3) BOM control
A real bill of materials matters because “similar fabric” is not the same fabric.
4) Incoming checks before cutting
This is where color drift gets caught early.
5) Clear approval record
Who approved, when, and under what standard.
Why this matters to your business
If you sell plush as a brand, your customers expect:
- the blue plush to be the same blue next time,
- the feel to match,
- the face to look consistent.
When reorders drift, you get:
- customer complaints,
- “my old one feels better” comparisons,
- brand trust damage.
The communication style that predicts reliability
Materials work requires clarity. A strong supplier:
- asks precise questions,
- summarizes decisions,
- labels swatches clearly,
- sends photos with reference swatches in frame,
- flags risks early.
A weak supplier:
- says “OK” without confirming,
- doesn’t record approvals,
- treats swatches casually.
Reliability often shows up first in how they communicate—not in how friendly they sound.
What is the history of modern plush fabrics (and why now ask for “mochi” handfeel)?
Modern plush fabrics evolved with consumer demand for softer, denser, more “luxury” tactile experiences. Minky-style polyester plush fabrics became common because they deliver consistent softness and durability in many textures. “Mochi” handfeel usually refers to a squishy, stretchy, marshmallow-like feel created by a soft plush surface combined with controlled stretch and balanced stuffing density. Trends matter because they influence buyer expectations and your product’s perceived value.
You don’t need a full “history of textiles” lecture to make good purchasing decisions, but understanding trends helps you avoid a mismatch between what expect and what you deliver.
Why plush expectations changed
In many markets, consumers now compare plush to:
- premium gift products,
- collectible brands,
- influencer merch drops,
- and “comfort objects” (desk buddies, calming plush).
That means:
- softness expectations are higher,
- surface quality is judged more quickly,
- handfeel becomes part of perceived brand value.
Why minky-style fabrics became so common
Many sources describe minky as a polyester plush knit fabric known for softness and availability in different weights and pile heights.
This kind of fabric family supports scalable production because:
- polyester microfiber behaves predictably,
- consistent dyeing and finishing is widely available,
- texture variants allow product differentiation.
Why “mochi” handfeel keeps coming up
“Mochi” is not a technical textile term in most factories—it’s -language term. It usually points to:
- a plush surface that feels smooth and soft,
- plus a body that feels squishy and resilient.
Some fabric guides describe mochi minky as a “marshmallow-like” softness style within plush fabric categories.
From a production standpoint, “mochi” is achieved by:
- choosing a surface fabric that’s smooth and pleasant,
- allowing controlled stretch (not uncontrolled distortion),
- selecting filling grade and stuffing density for bounce-back,
- using pattern engineering so it doesn’t collapse after shipping.
Trend-aware sourcing (the benefit)
Trends are not just marketing. They influence:
- what handfeel customers expect at each price point,
- what reviewers compare you to,
- and what fabric choices “read premium” in a quick unboxing.
FAQS
1) What plush fabric is best for my project: minky vs velboa vs sherpa vs faux fur?
If your plush needs clean face detail (small eyes, tight outlines, sharp expression), short-pile fabrics usually perform best. Minky and velboa tend to support clearer embroidery edges and more stable seams, so bulk looks closer to the approved sample. If your plush is built for “wow fluff” (display gifts, cozy characters, premium visual volume), sherpa or long-pile faux fur can look amazing—just plan for face clarity trade-offs and pile direction control.
A used simple rule many:
- Face-first designs → choose short pile and pick the face method (embroidery/print) that stays sharp.
- Texture-first designs → choose long pile, then simplify face art, or trim pile around face zones.
When you email Heyzizi, share your character art and target use case. We’ll recommend a fabric set that balances look, handfeel, and bulk repeatability. info@heyzizi.com
2) Which fabric specs should I confirm before I approve a plush fabric sample (GSM, pile length, backing, stretch)?
Approving “a swatch that feels nice” is not enough for B2B. A factory-ready approval should lock the specs that control bulk behavior. The main ones are GSM (weight), pile length + density, backing strength, and stretch direction + recovery. These specs affect whether seams stay clean, whether the plush holds shape after shipping, and whether face details remain consistent.
What to ask for (and approve in writing):
- Pile length range (short/medium/long, with a tolerance if possible)
- GSM range (so a reorder won’t feel thinner or heavier)
- Backing strength expectation (reduces seam distortion)
- Stretch direction (so cutting orientation stays consistent)
If you want, Heyzizi can provide stitch-test panels on your chosen fabric, so you’re approving how it behaves after sewing—not just how it feels as raw fabric.
3) How do I evaluate plush fabric samples before bulk production (beyond color and softness)?
Think like bulk. Bulk fabric gets cut fast, sewn by multiple operators, rubbed during packing, and compressed in cartons. So your sample evaluation should include quick “real life” checks, not just desk-touch.
Here’s -friendly checklist:
| Check | What you do | What it tells you |
|---|---|---|
| Stretch + recovery | Stretch gently, release, compare rebound | Shape drift risk |
| Seam puckering test | Sew a curved seam on sample | Sewing stability |
| Embroidery clarity test | Run a small eye outline | Face sharpness in bulk |
| Rub test | Rub with cloth 30–60 sec | Early fuzz / roughness |
| Brush direction check | Brush pile both ways | Nap shade swing risk |
| Needle mark check | Inspect under angled light | Surface damage risk |
If you send us your art and target handfeel, we can propose 2–3 fabric options and run the same tests so approvals are faster and bulk risk drops.
4) How can I prevent fabric pilling and roughness over time for plush toys?
Pilling and roughness usually come from friction + loose fibers. Keychain plush, bag hangers, and kids’ daily cuddle plush see higher friction than shelf collectibles. So prevention starts with matching fabric grade to real usage.
Practical prevention moves:
- Choose tighter, more stable fabric constructions for high-friction products.
- Avoid long pile on abrasion hotspots (chin, belly, underarm zones, strap contact zones).
- Specify a handfeel target that includes a “don’t want” list: no roughness, no fuzzing, no heavy lint.
- Ask for a basic abrasion screen on candidate fabrics before bulk.
Also, design choices matter. If a plush has straps, rings, or hard accessories rubbing against the body, add a reinforced contact patch or change the accessory location. That’s cheaper than handling returns later.
5) How does color matching work for plush fabrics (Pantone, lab dips, strike-offs), and how long does it take?
Color on plush is tricky because pile reflects light differently, and screens lie. For programs, Pantone is useful as a target, but usually lock color with physical approvals.
- Lab dip: a small dyed fabric sample for solid colors.
- Strike-off: a printed sample for prints, gradients, patterns, made on the right base fabric.
Timeline varies by approval speed and dye-house schedules, but the workflow stays the same:
- Confirm target (Pantone + physical reference if available)
- Request lab dip or strike-off
- Approve under consistent lighting
- Archive a master swatch for incoming checks
- Bulk dye/print using the approved standard
If you tell us your ship date and market channel, we’ll recommend the fastest safe color path and the approvals you should not skip.
6) Why does bulk color look different from the approved sample, and how do I prevent shade drift?
Most “color problems” are not a single cause. They’re usually a mix of dye lot variation, lighting differences, and nap direction changes (pile direction). Even the same dye can look warmer or cooler when pile runs the opposite way.
Prevention steps that work in real projects:
- Approve a physical master swatch and treat it as the final reference.
- Set a viewing rule: same lighting style for approvals (and photo proofs include the master swatch in frame).
- For visible panels, require consistent nap direction in cutting.
- Do incoming fabric checks before cutting, not after sewing starts.
This is exactly where a B2B-ready factory helps. At Heyzizi, we focus on getting color standards and cutting rules clear early, so bulk cartons don’t become a “surprise event.”
7) What handfeel target should I set, and how do I describe it so a factory can actually produce it?
“Soft” is not a spec. It’s a guess. A strong handfeel target has three parts:
- What customers should feel: smooth, squishy, fluffy, or firm structured
- A physical reference: approved swatch or competitor sample
- A “no” list: no stiff face panel, no rough belly, no scratchy pile
You can also add a simple scorecard so approvals are consistent:
| Attribute | Notes |
|---|---|
| Surface smoothness | silky vs grabby |
| Plush fullness | dense vs thin |
| Bounce-back | shape recovery |
| Premium feel | gift perception |
If you send us your target vibe and price level, we’ll translate it into fabric + filling options that can repeat in bulk.
8) Which filling works best with each fabric, and why does filling change the feel so much?
Fabric sets the surface. Filling sets the body. Two plush toys can use the same fabric but feel totally different because stuffing density and filling grade change everything.
Common options:
- Standard PP cotton: classic plush feel, cost-friendly, widely used
- High-resilience filling: better bounce-back, less “flat after shipping”
- Weighted beads: premium “heft,” better sitting stability (needs proper inner-bag control)
For “squishy/mochi-like” feel, the usual formula is: smooth plush surface + controlled stretch + balanced stuffing density. For shelf plush that must hold posture, you may need structured pattern planning plus resilience filling.
Tell us your target use case and shipping route (air/sea). We’ll recommend filling that holds up after compression.
9) What accessories affect cost the most in plush, and why do quotes change so much?
In plush quoting, accessories often change cost more than fabric because they add labor steps, sourcing constraints, and QC risk. The biggest cost drivers typically include:
- High stitch-count embroidery (especially faces and large logos)
- Custom hardware (custom zipper pulls, custom metal pieces)
- Zippers + pockets (extra sewing + reinforcement)
- Sound/LED modules (assembly + sourcing + extra checks)
- Retail packaging upgrades (color boxes, inserts, display cartons)
Here’s a practical view:
| Feature | Typical cost impact | Why |
|---|---|---|
| Face embroidery stitch count | High | machine time + handling |
| Custom metal hardware | High | tooling + lead time |
| Zippers/pockets | Medium–High | extra steps + reinforcement |
| Sound/LED module | High | assembly + risk control |
| Retail color box + insert | Medium–High | print + dielines |
If you want stable quotes, list accessories clearly in your RFQ. A “cute add-on” added late can change both price and lead time.
10) How many fabric colors can I choose, and what happens if I have many SKUs or small quantities per color?
You can choose many colors, but cost and timeline often rise with every extra colorway because of dye minimums, extra approvals, and more risk of shade drift across lots. If each SKU has small quantity, the unit cost may climb, and lead time can stretch due to color batching.
A practical SKU strategy many brands use:
- Start with 2–4 core colors for the first run
- Validate demand and reviews
- Expand colorways once bulk repeatability is proven
If you share your total quantity and SKU split, Heyzizi can propose a color plan that fits your budget while still keeping the product line coherent.
11) What tests or compliance planning should I consider for plush materials when selling to the US/EU/UK?
Compliance needs depend on market and age grading. The materials and attachments you choose (eyes, magnets, small parts, modules) can change what checks are needed. Even when the brand side handles the final paperwork, factory readiness matters because bulk must be built to pass realistic requirements.
From ’s point of view, the smart move is simple:
- Tell the factory your destination market (US/EU/UK/other)
- Confirm product features that add risk (small parts, magnets, electronics)
- Plan materials early so you’re not redesigning after bulk is finished
If you’re not sure what applies, send us your product concept and market. We’ll flag material risk points early so you can plan confidently.
12) What should I send Heyzizi to get an accurate fabric recommendation and quote ?
To get a quote that doesn’t bounce later, send a factory-ready mini pack. It can be simple, but it should be complete:
- Product type (plush toy, keychain, mascot, pillow plush)
- Target size (height/length + tolerance)
- Art files (AI/PDF/PSD if possible + reference photos)
- Handfeel target (smooth / squishy / fluffy / structured)
- Color count + Pantone (or physical references)
- Face method preference (embroidery/print/hybrid)
- Accessories list (rings, zippers, modules, labels)
- Packaging level (polybag, hangtag, color box, display carton)
- Quantity + SKU split
- Destination market + ship date
The clearer this is, the faster we can reply with realistic options on materials, color matching steps, sampling path, and cost drivers. Email us anytime: info@heyzizi.com