 Skip to content
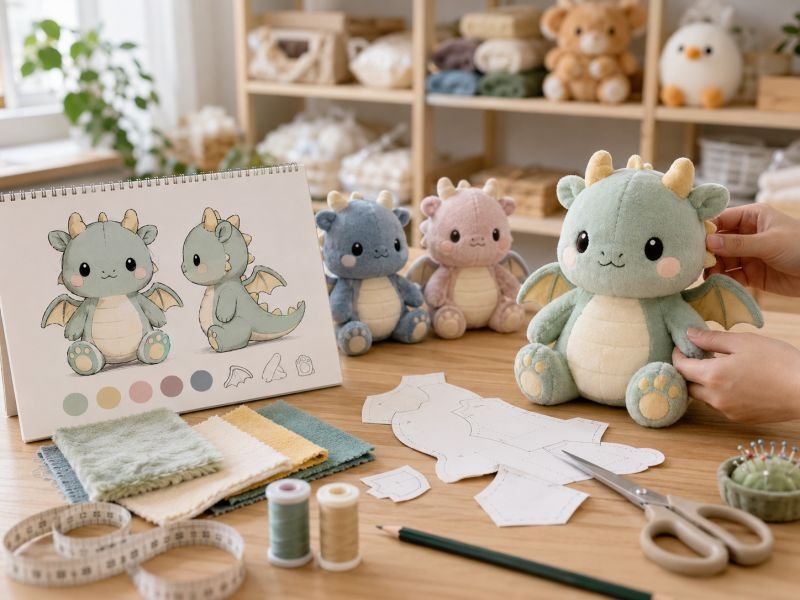
A strong character may start as a sketch, mascot, game avatar, comic figure, children’s book role, or licensed IP image. On screen, the design can use thin lines, dramatic poses, gradients, sharp shapes, tiny marks, and perfect symmetry. Once it becomes a plush toy, the character must live in fabric, seams, filling, embroidery, labels, packaging, and repeated production. That is where many projects become harder than expected.
To turn character art into custom character plush toys, the design should be reviewed as a 3D soft product. The process usually includes artwork checking, proportion adjustment, fabric selection, craft planning, sample making, sample revision, approved sample confirmation, bulk production, QC, packaging, labels, and shipment preparation. The best result keeps the character recognizable while making it soft, stable, safe, and repeatable.
A plush version should not be a flat copy of the drawing. It should feel like the same character after being rounded, filled, held, photographed, packed, and shipped. A tiny eyebrow may need to become thicker embroidery. A complex jacket may become applique or print. A sharp tail may need more thickness. A mascot face may need slightly larger eyes to keep the same emotion. Good plush development is not about changing the character randomly; it is about protecting the parts people remember first.
What Makes Character Art Plush-Ready?
Character art becomes plush-ready when the design can be translated into a soft 3D product without losing its identity. The artwork should show the main face, body shape, color zones, side thickness, back details, key features, optional details, target size, product type, packaging needs, and quantity plan.
A good plush-ready design does not need to be a sewing pattern. It needs to give enough information for practical development. A clean mascot drawing, original character sheet, game character file, children’s book role, brand figure, or licensed IP image can all become plush toys when the important details are clear.
The main challenge is that 2D art can hide physical problems. A front-view drawing may show a perfect face, but it may not show whether the body is round, flat, sitting, standing, hanging, or pillow-like. It may show a tail from the side but not how it attaches at the back. It may show a jacket from the front but not how the back should look. It may show thin hair spikes, tiny fingers, sharp horns, small logos, or delicate accessories that look good on screen but need adjustment in plush form.
A plush-ready review should separate the artwork into three groups:
| Detail Group | Meaning | How To Treat It |
|---|---|---|
| Must-keep features | Details that define the character | Protect during sample development |
| Adjustable features | Details that support the character | Modify for fabric, size, and sewing |
| Optional features | Details that are small, hidden, or hard to repeat | Simplify, move, or remove when needed |
This approach keeps the plush close to the original character without forcing every drawn line into fabric. For example, a character’s big eyes, round ears, red scarf, and tail may be essential. Tiny sleeve folds, thin shoe lines, or very small decorative marks may be simplified or moved to a hangtag, woven label, or package card.
Before sampling, the project team should prepare a short creative and product brief. It does not need to be complicated. It should explain what the plush will be, how it will be used, which details must stay, which size is expected, and whether it needs packaging, labels, accessories, or testing support.
| Plush-Ready Item | What To Prepare | Why It Matters |
|---|---|---|
| Main artwork | Clean front image | Shows face, color, and first impression |
| Side information | Side sketch or written notes | Confirms thickness, snout, belly, tail, posture |
| Back information | Back sketch or reference notes | Confirms rear colors, hair, clothing, tail, label area |
| Target size | 8cm, 10cm, 15cm, 20cm, 30cm, etc. | Controls detail clarity and stuffing space |
| Product type | Keychain, mascot, full-body plush, blind box, gift plush | Changes structure and cost |
| Must-keep features | Face, color, symbol, accessory, silhouette | Protects recognition |
| Material direction | Soft plush, short-pile, minky-style, faux fur | Guides hand feel and final look |
| Craft direction | Embroidery, print, applique, fabric parts | Controls face and detail execution |
| Packaging idea | Polybag, hangtag, blind box, gift box | Affects size, shape, and carton volume |
| Quantity plan | Per design and total quantity | Affects MOQ, quote, and production setup |
The strongest starting file is usually a character sheet with front, side, back, color notes, and detail close-ups. When that is not available, a clear front picture can still begin the review. The missing information can be completed through sketches, written notes, reference photos, or sample-stage decisions.
A character is plush-ready when the design has enough clarity to reduce guessing. Less guessing means fewer sample changes, better cost control, and a stronger chance that the final plush still feels like the original character.
Can You Make A Stuffed Animal From A Picture?
A stuffed animal can be developed from a picture, but the picture should be treated as the starting material, not the full production instruction. A front picture can show the character’s expression, colors, and general shape, yet it may not show body depth, back details, fabric texture, tail position, label area, or package fit.
For simple characters, one picture may be enough for early feasibility review. A round animal head, simple mascot, or clean cartoon figure can often move into sample planning with a front image plus size and quantity details. More complex characters need more information before sampling, especially if they include hair, wings, horns, shoes, clothing, props, or a special pose.
| Picture Quality | What Can Be Reviewed | What Still Needs Confirmation |
|---|---|---|
| One clean front image | Face, colors, main silhouette | Back, thickness, tail, side shape |
| Front and back views | Main identity and rear details | Side volume and posture |
| Full turnaround sheet | Shape, balance, color placement | Fabric and filling choice |
| Character guide | Personality, color, key features | Plush structure and craft plan |
| Photo reference | Texture, pose, accessory idea | Exact pattern and production method |
A single picture often leaves physical unanswered. Should the plush be round or slightly flat? Should the character sit or stand? Is the hair a printed detail or a raised fabric part? Should the tail be stuffed or flat? Does the character need a keyring, hangtag, or box? These decisions affect cost, sample time, and final appearance.
A picture can absolutely become a plush toy. The better path is to use the picture as the visual anchor, then complete the missing product details before sampling begins.
What Artwork Files Work Best?
The best artwork files are clean, high-resolution, color-clear, and easy to interpret. Vector files help with logos, symbols, outlines, and flat color zones. Layered files help separate face, body, clothing, and accessories. Clear PNG, JPG, PDF, AI, PSD, or hand-drawn references can all work when the design information is strong.
A polished illustration is not always the easiest file for plush development. Some finished art uses lighting, shadows, gradients, brush texture, extreme perspective, or decorative effects. These can make the character look beautiful, but they may not explain how to cut fabric, place embroidery, shape the body, or make the back view.
| File Type | Best Use | Practical Note |
|---|---|---|
| AI / EPS / SVG | Logos, clean outlines, symbols | Strong for exact marks and flat graphics |
| PSD | Layered character details | Useful for separating face, clothes, accessories |
| PNG | Clean artwork with transparent background | Good for review and quotation |
| JPG | General reference image | Works if sharp and high resolution |
| Character sheet, style guide, color guide | Good for official design direction | |
| Hand sketch | Early OC concept or pose | Better with written notes |
| Photo reference | Fabric feeling, accessory, display idea | Should support, not replace, character views |
A strong artwork file should clearly show:
- Face expression
- Head shape
- Body proportion
- Main color zones
- Eyes, nose, mouth, brows, blush
- Ears, horns, hair, tail, wings, paws, feet
- Clothing or accessory placement
- Logo, symbol, or badge
- Desired pose
- Target size
- Details that must not change
When artwork is incomplete, it can still be used. The key is to identify missing details early. If there is no side view, a simple side sketch can be added. If the logo is too small for embroidery, it can move to a tag. If gradients are hard to match in fabric, they can become printed panels or simplified color zones.
The best file is not only “beautiful.” It is useful for making a physical plush.
Which Views Should Be Prepared?
The most useful views are front, side, and back. Front view protects the character’s face and first impression. Side view confirms body thickness, snout, belly, posture, tail angle, and standing or sitting balance. Back view confirms rear color zones, clothing, hair, tail placement, and label position.
Many plush problems start with missing views. A front drawing may look complete, but it cannot show everything. A character may have a tail hidden behind the body. A jacket may need a back seam. Hair may wrap around the head. A cape may need a separate pattern. A mascot may need a round body from the side, not a flat one.
| View | What It Helps Decide | When It Is Important |
|---|---|---|
| Front view | Face, body width, front colors | Every plush project |
| Side view | Depth, snout, belly, tail, posture | Animals, full-body characters, sitting plush |
| Back view | Rear colors, hair, clothing, label area | Characters with tails, clothes, hair, markings |
| Top view | Ear spacing, head shape, hair direction | Characters with ears, horns, or special hair |
| Bottom view | Sitting base, feet, seam plan | Sitting plush, weighted plush, beanbag base |
| Detail view | Logo, paw pad, embroidery, accessory | Small marks and signature features |
Not every project needs all six views. A simple plush keychain may only need front, back, and hardware position. A mascot head may need front, side, back, and face close-up. A full-body character with clothing, hair, shoes, and accessories benefits from a fuller view set.
A simple rule works well: if a detail affects pattern, sewing, embroidery, filling, label placement, packaging, cost, or inspection, it should be shown or described before sampling.
Why Does 2D Art Need Adjustment?
2D art needs adjustment because plush toys are soft, thick, rounded, stitched, filled, and handled. A flat drawing can use sharp lines, tiny details, gradients, floating accessories, extreme poses, and perfect symmetry. A plush must work with fabric thickness, seam allowance, filling pressure, material stretch, safety review, and repeat production.
A direct copy can create weak results. Thin arms may not turn and fill cleanly. Tiny fingers may disappear inside seams. Sharp hair spikes may become floppy. A narrow tail may twist. A detailed jacket may become bulky. Small text may be unreadable. Dense face embroidery may make fabric stiff or distort the expression.
| 2D Detail | Plush Risk | Better Plush Treatment |
|---|---|---|
| Thin arms | Hard to sew and fill | Make thicker or slightly shorter |
| Tiny fingers | Lose shape | Use paw form or stitch lines |
| Sharp hair spikes | Floppy or uneven | Round, widen, or layer as applique |
| Small text | Unreadable on fabric | Move to tag, woven label, or package |
| Complex jacket | Bulky seams | Use fabric panels, print, or embroidery |
| Gradient shading | Hard to match with fabric | Use solid zones, print, or texture |
| Narrow tail | Twists or collapses | Widen, shorten, or reinforce |
| Floating detail | No stable attachment | Attach, print, or simplify |
| Extreme pose | Unstable shape | Convert to sitting, standing, lying, or hanging form |
Adjustment should protect the character, not dilute it. If oversized ears define the character, they should stay strong. If a special smile gives the character personality, it should be carefully preserved. If a red scarf is the most memorable accessory, it should remain visible. If tiny sleeve folds do not affect recognition, they can be simplified.
A good plush version should feel natural. It should not look like the drawing was copied without understanding the material. It should look like the character was always meant to become a soft toy.
What Details Should Stay Or Simplify?
The details that should stay are the details people recognize first: face expression, main colors, head shape, ears, hair, tail, horns, wings, signature clothing, symbol, or accessory. The details that should be simplified are tiny, fragile, hidden, unreadable, costly to repeat, or likely to deform after stuffing and packing.
A plush toy does not need every line from the artwork. It needs the right details in the right places. A mascot may need bold eyes, mouth, color, and silhouette more than tiny shoe seams. An original character may need hair and expression more than every clothing fold. A collectible plush may need consistent body size, charming face details, and clean packaging more than small hidden marks.
| Keep Strong | Simplify Or Move |
|---|---|
| Main face expression | Thin shadow lines |
| Signature colors | Complex gradients |
| Special ears, tail, horns, wings | Ultra-thin tips |
| Main outfit shape | Tiny buttons and folds |
| Large symbol or badge | Micro text |
| Strong silhouette | Floating decorative details |
| Character posture | Extreme action movement |
| Key accessory | Hidden or fragile add-ons |
A practical detail ranking can help:
| Detail Level | Role In Character | Best Treatment |
|---|---|---|
| Tier 1 | Defines identity | Keep close to artwork |
| Tier 2 | Supports personality | Adjust for plush structure |
| Tier 3 | Nice but not essential | Simplify, move, or remove |
This ranking prevents random cutting. It also makes sample review easier. When the team agrees that the face, ears, scarf, and tail are Tier 1, those details receive more attention. When tiny clothing folds are Tier 3, they can be simplified without hurting the character.
Strong plush development is not about adding more and more detail. It is about choosing the details that matter enough to be held in fabric.
How Does 2D Art Become A Plush Shape?
2D art becomes a plush shape by turning flat lines into soft volume. The process reviews character proportion, side depth, pattern pieces, seam placement, fabric behavior, face craft, filling level, balance, accessories, and final use. The goal is to keep the character recognizable while making it soft, stable, touchable, and suitable for repeat production.
A drawing has height and width. A plush toy has height, width, depth, softness, weight, seam direction, fabric pile, filling pressure, and physical balance. This is why a character cannot move from artwork to plush by simply copying its outline. The image must be translated into a physical object that can be cut, sewn, stuffed, shaped, checked, packed, and delivered.
The first step is to decide what kind of plush the character should become. A mascot head, full-body plush, keychain, bag charm, blind box plush, pillow plush, and gift plush all use different structure logic. A keychain needs compact size and hanging balance. A full-body character needs head-body proportion and limb control. A blind box plush needs consistent size across several designs. A pillow plush needs flatter volume and strong softness.
A 2D character may also have details that look easy on screen but become difficult in fabric. Sharp hair spikes may need rounding. Thin legs may need to be thicker. A tiny mouth may need simpler embroidery. Floating accessories may need to be attached, printed, or removed. The best plush version usually keeps the character’s identity, but changes the construction so the final product feels natural in the hand.
| 2D Planning Area | Plush Shape Decision | Why It Matters |
|---|---|---|
| Character size | Height, width, depth | Controls detail clarity and filling space |
| Head shape | Round, oval, flat, wide, tall | Affects face expression and cuteness |
| Body posture | Sitting, standing, lying, hanging | Affects balance and package fit |
| Limb thickness | Arm, leg, paw, wing, tail width | Affects sewing and stuffing |
| Face position | Eye, mouth, nose, blush placement | Protects emotion and recognition |
| Fabric choice | Surface, stretch, pile direction | Changes shape and color feeling |
| Seam plan | Where pieces join | Affects smoothness and appearance |
| Filling level | Soft, firm, rounded, flat | Changes hand feel and shape stability |
| Accessory position | Ring, scarf, bow, tag, magnet | Affects use, strength, and packing |
| Packaging fit | Polybag, box, blind box, display carton | Protects shape during delivery |
A good plush shape is not only cute. It must make sense from all angles. The front view should feel close to the character. The side view should have enough depth. The back view should match the artwork or project notes. The plush should not collapse, twist, lean badly, or lose its expression after packing.
How To Turn Your OC Into A Plushie?
To turn an OC into a plushie, start by defining the character’s identity before discussing fabric and size. The project should identify the features that make the OC instantly recognizable: face, hairstyle, ears, tail, outfit, colors, symbol, accessory, or posture. These details guide every later decision.
Many original characters begin with only a front drawing. That is enough for early review, but it is not enough to control the final plush. The plush development team needs to understand how the character should feel in real life. Should it be soft and round? Small and collectible? Designed as a bag charm? Made as a 20cm desk plush? Packed in a blind box? These choices affect structure before sample work begins.
A clear OC plush brief can include:
| OC Detail | What To Prepare | How It Helps |
|---|---|---|
| Character name | Name or SKU code | Keeps sample and order records clear |
| Main artwork | Front image | Shows identity and expression |
| Side or back notes | Sketches or written comments | Reduces guessing |
| Must-keep features | Eyes, hair, scarf, tail, symbol | Protects recognition |
| Target size | 10cm, 15cm, 20cm, 30cm, etc. | Sets detail space |
| Plush type | Keychain, mascot, full-body, blind box | Controls structure |
| Fabric direction | Smooth, fluffy, short pile, soft touch | Shapes final feel |
| Quantity plan | Per design and total pieces | Helps cost and MOQ review |
| Package idea | Polybag, tag, box, blind box | Affects body size and layout |
An OC plush should not feel like a rough copy. It should feel like the character has become real. To reach that result, some details may need to change. Tiny clothing folds may become stitch lines. Small marks may move to a tag. Sharp shapes may become softer. Thin arms may become thicker. These changes protect the plush instead of weakening it.
A useful way to guide the project is to separate OC details into three groups:
| Detail Level | Meaning | Best Treatment |
|---|---|---|
| Core identity | The character is not itself without this detail | Keep close to artwork |
| Support detail | Adds personality but can be adjusted | Modify for fabric and size |
| Optional detail | Nice to have but hard to see or repeat | Simplify or move to packaging |
This keeps the sample review focused. If the face, hairstyle, and red scarf are core identity features, they deserve the most attention. If tiny sleeve folds are optional, they should not delay the full project.
How Is Character Proportion Reviewed?
Character proportion is reviewed by checking how the head, body, face, limbs, ears, tail, and accessories work as a filled 3D object. The artwork may look balanced in 2D, but plush needs enough body depth, seam space, stuffing room, and physical support.
Many character designs use exaggerated proportions. A large head and tiny body may look charming in an illustration. In plush form, the head may need a stronger neck or wider body base. Long thin arms may look elegant on paper but difficult to stuff evenly. Tall ears may need extra thickness to avoid folding. A long tail may need a wider base so it does not twist or hang awkwardly.
Proportion review should include front, side, and back thinking:
| Proportion Area | What To Check | Possible Adjustment |
|---|---|---|
| Head size | Does it overpower the body? | Add body depth or neck support |
| Face area | Is there enough room for eyes and mouth? | Enlarge face zone or simplify details |
| Body depth | Will the plush feel full? | Add side thickness |
| Arms | Are they sewable and fillable? | Make thicker or shorten |
| Legs and feet | Can the plush sit or stand? | Widen feet or adjust posture |
| Ears | Will they hold shape? | Add width or use firmer structure |
| Tail | Will it attach cleanly? | Shorten, widen, or change angle |
| Hair | Does it wrap around the head? | Use fabric panels, applique, or stitch lines |
| Accessories | Do they affect balance? | Move, lighten, or reinforce |
Size changes the review. A 10cm plush cannot carry the same face and clothing detail as a 30cm plush. A 7cm keychain may need bold eyes and fewer body parts. A 20cm character plush can hold more embroidery, outfit structure, and body depth. A 30cm gift plush can carry richer shape and stronger hand feel, but packaging and shipping volume become more important.
Proportion review also protects emotion. Eye distance, mouth position, cheek size, and head angle can change the character’s personality. A few millimeters can make a plush look sleepy, happy, shy, angry, or blank. That is why face and body proportions should be reviewed together, not separately.
Which Plush Type Fits The Art?
The right plush type depends on the character’s shape, detail level, use scene, size goal, packaging style, and quantity plan. A simple mascot face may work well as a plush head, keychain, or bag charm. A full-body character with clothing and accessories may need a larger size. A group of cute creatures may work well as a blind box plush series.
Choosing the wrong plush type can create cost and quality problems. A detailed character squeezed into a tiny keychain may lose expression, clothing, and body shape. A simple icon made too large may look empty. A long-haired character may need more size to show the hairstyle properly. A plush with many accessories may need a collectible format rather than a very small charm.
| Character Art Style | Better Plush Direction | Planning Focus |
|---|---|---|
| Simple round mascot | Mascot head, keychain, mini plush | Strong face, clear color, soft shape |
| Animal character | Full-body plush, blind box, gift plush | Ears, tail, posture, fabric texture |
| Human-like OC | 15cm–30cm full-body plush | Hair, outfit, face expression |
| Detailed costume character | Larger plush with mixed craft | Clothing simplification and embroidery |
| Logo character | Mascot plush or event plush | Shape and color recognition |
| Cute creature collection | Blind box plush or multi-style set | Consistent size and SKU control |
| Soft icon shape | Pillow plush or cushion | Flatter body and soft filling |
| Bag-use character | Keychain or bag charm | Hardware strength and hanging balance |
The plush type should match the way people will use the product. A mascot for a campaign needs quick recognition. A fan collectible needs character accuracy. A gift plush needs softness and presentation. A bag charm needs durability and a stable hanging angle. A blind box plush needs consistent size, package fit, and style separation.
A practical decision flow can help:
| Main Goal | Better Direction |
|---|---|
| Small giveaway or event item | Mini plush or plush keychain |
| Premium keepsake | 20cm–30cm full-body plush |
| Mystery series | 8cm–12cm blind box plush |
| Retail shelf display | Plush with hangtag or display box |
| Bag accessory | Bag charm with reinforced loop |
| Soft home item | Pillow plush or cushion |
| Mascot recognition | Plush head or simplified full-body plush |
The best plush type protects the artwork instead of forcing the artwork into the wrong format. When format and character match, the sample usually needs fewer major revisions.
2D Art vs 3D Plush: What Changes?
When 2D art becomes 3D plush, the biggest changes are volume, seam placement, material texture, face craft, color separation, posture, body balance, and detail simplification. A drawing can use perfect lines and flat colors. A plush must work with fabric, filling, stitching, and handling.
Some changes are natural. Sharp corners become rounded. Fine lines become embroidery, printing, applique, or seam lines. Gradients become fabric choices or printed panels. Flat shapes become stuffed parts. Extreme poses become stable sitting, standing, lying, or hanging positions. A floating item in the drawing must be attached, printed, or redesigned.
| 2D Feature | 3D Plush Change | Reason |
|---|---|---|
| Flat face | Curved surface with embroidery or print | Face sits on filled fabric |
| Sharp tips | Rounded soft forms | Fabric and filling need width |
| Thin outlines | Stitch, print, seam, or simplified panel | Very thin fabric parts are unstable |
| Tiny marks | Larger embroidery, print, tag, or removal | Small details may not read clearly |
| Gradient color | Fabric texture, print, or solid color zone | Plush fabric has limited gradient control |
| Dynamic pose | Sitting, standing, lying, or hanging form | Plush needs balance |
| Floating accessory | Attached part, sewn detail, or printed effect | It must exist physically |
| Fine text | Hangtag, woven label, or package detail | Tiny text is difficult on plush body |
The goal is not to make the plush “less detailed.” The goal is to make the detail work in the right material. A line can become embroidery. A jacket seam can become print. A hair shape can become a layered fabric piece. A symbol can move to a woven label. A tiny mark can become larger and clearer.
The side view often changes the most. In 2D, a character may look slim and flat. In plush, the body needs thickness so it feels soft and full. The head may need a rounder back. The belly may need more volume. The tail may need a stable attachment. The ears may need shape support. These changes make the plush feel finished rather than flat.
Packaging also affects 3D decisions. If the plush must fit in a 10cm blind box, ears, tail, and body thickness must be planned around that space. If it will hang as a keychain, the loop position should help the face forward. If it will be shipped in large cartons, shape recovery after packing should be checked.
How Are Face Details Made?
Face details are made through embroidery, printing, applique, fabric pieces, plastic safety eyes, or mixed craft. The best method depends on the character style, size, fabric surface, target age, final look, and quantity. The face usually carries the strongest recognition, so it should be planned carefully before sample approval.
Embroidery is often used for eyes, nose, mouth, eyebrows, blush, paw pads, and simple marks. It is durable and clean, but dense embroidery can become stiff on small plush. Printing works well for fine graphics, flat color effects, gradients, and details too small for stitches. Applique adds dimension for larger eyes, patches, or special markings. Fabric pieces can create soft facial features. Plastic safety eyes may fit some animal plush, but age group and safety review are important.
| Face Method | Best Use | Watch Area |
|---|---|---|
| Embroidery | Eyes, mouth, nose, brows, blush | Stitch density and placement |
| Printing | Fine lines, patterns, gradients | Fabric surface and color clarity |
| Applique | Large eyes, patches, shaped marks | Edge neatness and alignment |
| Fabric pieces | Soft baby style or simple character face | Symmetry and sewing |
| Plastic safety eyes | Certain animal plush styles | Attachment strength and age review |
| Mixed craft | Complex character faces | Cost and consistency |
Face planning should start with scale. A face that looks clear on a 25cm plush may become crowded on a 10cm plush. If the eyes are too small, the expression may disappear. If the mouth is too thin, it may not be visible. If blush is too detailed, it may look messy. If a logo sits on the face area, it may distract from the expression.
A good face review should check:
| Face Check | What To Review |
|---|---|
| Eye size | Does the plush still feel like the character? |
| Eye distance | Does the expression look right? |
| Mouth height | Does it change the mood? |
| Nose size | Is it clear but not too heavy? |
| Blush or marks | Are they visible at final size? |
| Thread color | Does it match the artwork and fabric? |
| Face position | Does stuffing shift the expression? |
| Symmetry | Are left and right details balanced? |
For character plush, the face should be reviewed on the actual sample, not only as an embroidery file. Fabric stretch, stuffing, seam position, and head shape can all change the final expression. A face that looks correct before stuffing may shift after the head is filled. This is why the approved sample should lock both face craft and body fullness together.
Which Materials And Crafts Work Best?

The best materials and crafts are the ones that keep the character recognizable, pleasant to touch, stable in bulk work, and suitable for its final use. Fabric controls hand feel and body shape. Embroidery, printing, applique, labels, and accessories control face expression, outfit detail, symbols, texture, and presentation.
A character plush is not judged by softness alone. It must still look like the original character after the design becomes rounded, stitched, filled, packed, shipped, displayed, photographed, and handled. That means material and craft choices should be made around the character’s strongest features.
If the character is a clean cartoon mascot, a short, smooth fabric with crisp embroidery may work better than long fur. If the character is a fuzzy creature, surface texture may matter more than tiny clothing lines. If the character is a collectible blind box plush, consistent fabric, stable color, and clear face craft may matter more than large size. If the plush is a keychain or bag charm, fabric durability, loop strength, and hardware balance should be reviewed early.
Material and craft planning should begin after three details are clear: target size, product type, and must-keep character features. A 10cm plush cannot carry the same amount of embroidery as a 30cm plush. A plush keychain must stay compact and light. A premium gift plush needs stronger hand feel and cleaner presentation. A multi-style series needs consistent fabric quality and color control across different characters.
| Character Need | Better Direction | What To Watch |
|---|---|---|
| Clean mascot face | Short-pile or minky-style fabric with embroidery | Eye position and stitch density |
| Fuzzy animal feel | Faux fur or longer pile fabric | Trimming, pile direction, seam visibility |
| Soft gift plush | Gentle fabric, fuller filling, neat finishing | Shape recovery after packing |
| Keychain use | Compact body, reinforced loop, light hardware | Hanging angle and attachment strength |
| Blind box series | Shared fabric family and consistent size | SKU control and package fit |
| Detailed outfit | Printing, applique, embroidery, or mixed craft | Avoid bulky seams at small size |
| Tiny logo | Woven label, hangtag, or package card | Readability |
| Premium collection | Softer surface, clean craft, strong package match | Material consistency and carton volume |
The strongest material plan is usually focused, not crowded. Too many fabric textures, thread colors, small patches, and accessories can make the plush difficult to repeat and visually busy. A cleaner plan often gives the character more charm. The face should be readable. The fabric should match the character’s personality. The body should feel good in the hand. The package should protect the shape.
Which Fabric Matches Character Style?
Fabric should match the character’s personality, shape, size, and use scene. A round mascot often needs a smooth surface that keeps embroidery clear. A fantasy creature may need texture. A baby-style character may need a soft and gentle hand feel. A collectible plush may need fabric that photographs well and keeps color stable across several styles.
Different plush fabrics create different visual effects. Short-pile plush is useful for clean character shapes because it keeps seams and embroidery easier to control. Minky-style fabric gives a smooth, soft, premium feel and is common for character plush, gift plush, and collectible items. Velboa-style fabric gives a short surface and can work well for smaller plush. Faux fur creates stronger texture, but it needs more trimming and pile-direction control. Sherpa-like fabric gives a cozy feeling but can make small details less sharp.
| Fabric Direction | Best Use | Strength | Watch Area |
|---|---|---|---|
| Short-pile plush | Mascots, mini plush, keychains | Stable shape and clean face craft | May feel plain if the quality level is low |
| Minky-style fabric | Character plush, gift plush, soft collectibles | Smooth touch and clear color | Stretch and seam control |
| Velboa-style fabric | Small plush, clean shapes, printed areas | Short surface and neat detail | Hand feel varies by grade |
| Faux fur | Animals, monsters, fantasy creatures | Rich texture and strong personality | Pile direction and trimming |
| Sherpa-like fabric | Cozy characters, winter themes, wellness plush | Warm and soft look | Thickness can hide small details |
| Fleece-like fabric | Simple soft shapes and pillows | Friendly, smooth surface | May show pressure around seams |
| Printed fabric | Clothing, patterns, markings | Adds detail without extra sewn panels | Print clarity and color approval |
Fabric thickness also affects size. A 12cm plush made with thick sherpa-like fabric may feel bulkier than expected. A 10cm plush made with short-pile fabric may hold a cleaner face. Long fur can make a character look richer, but it may cover small embroidery or reduce the clarity of facial details.
For multi-style collections, fabric consistency becomes important. If one style uses a very soft fabric and another style uses a flatter fabric, the set may feel uneven. A shared material family can make a series look more connected, while color and accessories create variety.
A practical fabric review should check:
| Fabric Check | Why It Matters |
|---|---|
| Surface length | Affects face clarity and seam visibility |
| Stretch | Affects shape and symmetry |
| Thickness | Affects small parts and stuffing |
| Color stability | Affects bulk consistency |
| Touch | Affects perceived value |
| Pile direction | Affects shade under different lighting |
| Repeat availability | Affects reorders and long-term series |
The best fabric is not always the most expensive one. It is the one that supports the character, the size, the craft method, and the final use without creating unnecessary production pressure.
Embroidery vs Printing: Which Is Better?
Embroidery is usually better for durable and clean face details, while printing is better for fine graphics, patterns, gradients, and thin lines that would become too dense in stitches. Many character plush toys use both methods: embroidery for the face, printing for clothing or small surface graphics.
Embroidery gives a plush a finished and lasting feel. It works well for eyes, nose, mouth, eyebrows, blush, paw pads, simple symbols, and bold character marks. It is especially useful when the face needs to stay clean after handling. However, embroidery has limits. Dense stitching can make small plush faces stiff. Too many thread colors increase setup and checking work. Very tiny logos may lose readability.
Printing is useful when artwork has fine details, color gradients, small patterns, or clothing effects that would not work well as embroidery. A printed jacket pattern may look cleaner than several tiny sewn panels. A printed cheek pattern may feel lighter than dense stitches. Printing also helps when the plush surface needs graphic detail without adding thickness.
| Detail Type | Embroidery Works Better When | Printing Works Better When |
|---|---|---|
| Eyes | The shape is bold and needs durability | The eye has complex gradients or shine |
| Mouth | The line is simple and visible | The line is very thin or delicate |
| Blush | A stitched soft mark fits the character | A smooth color effect is preferred |
| Logo | The logo is large enough to read | The logo has small text or detail |
| Clothing | Lines are bold and limited | Patterns, folds, and flat graphics are needed |
| Body markings | The mark is simple | The mark has many colors or soft edges |
| Tiny text | Usually not ideal | Better moved to tag or package |
Applique can also be useful. It adds a fabric layer for larger eyes, belly patches, markings, badges, or outfit areas. It gives texture and dimension, but it adds cutting, placement, sewing, and edge control. For larger plush, applique can look premium. For small plush, it should be used carefully so the body does not become bulky.
A strong craft plan should ask:
- Does this detail need to be touched, seen, or read?
- Is it large enough for embroidery?
- Will stitching make the fabric stiff?
- Would printing keep the line cleaner?
- Would applique add useful texture?
- Could the detail move to a hangtag, woven label, or box?
- Will the same craft stay consistent across all styles?
The best craft method is the one that makes the character clearer, not the one that simply copies the artwork line by line.
What Type Of Filling Works Best?
Filling should match the plush size, body shape, softness target, pose, and use scene. Standard soft polyester filling is common for character plush because it creates a light and squeezable hand feel. Some plush toys need firmer filling to hold shape. Others need special structure if weight, sitting balance, or interactive features are involved.
Filling changes how the character looks after sewing. Too little filling can make the head flat, the body wrinkled, and the limbs weak. Too much filling can make the plush stiff, distort face embroidery, and pull seams too tightly. The right filling level keeps the character soft while holding its intended shape.
| Plush Type | Filling Goal | What To Watch |
|---|---|---|
| Mascot head plush | Round, smooth head shape | Face surface should not wrinkle |
| Full-body character plush | Balanced softness and body volume | Head-body support |
| Plush keychain | Compact and light body | Avoid oversized thickness |
| Blind box plush | Consistent body size across styles | Package fit |
| Gift plush | Soft hand feel and full shape | Recovery after packing |
| Pillow plush | Fuller, softer body | Even distribution |
| Sitting plush | Stable base and body balance | Leaning or falling |
| Weighted plush | Special internal planning | Weight placement and seam strength |
Small parts need special care. Ears, tails, arms, feet, horns, and wings often need controlled filling. If they are too thin, they may not fill properly. If they are too firm, they may look stiff or pull the body out of shape. If they are too long, they may bend inside packaging.
Filling should also be checked with the final package. A plush may look perfect on a sample table but arrive flattened if the package is too tight. A soft plush in a compressed box may need time to recover. A gift plush should hold a pleasant shape when opened. A blind box plush must fit the box while still looking full after removal.
A useful sample review should check:
| Filling Check | What To Review |
|---|---|
| Head fullness | Does the face look smooth? |
| Body softness | Does it feel right for the product role? |
| Limb filling | Are arms, feet, tail, and ears even? |
| Shape recovery | Does it bounce back after packing? |
| Sitting balance | Does it sit as intended? |
| Hanging balance | Does a charm face forward? |
| Consistency | Can the same feel be repeated in bulk? |
Filling is often invisible in a quote, but it is obvious when someone holds the plush. Good filling makes the plush feel complete.
When Do Accessories Need Extra Review?
Accessories need extra review when they affect safety, strength, balance, packaging, cost, or daily use. Keyrings, clasps, ball chains, hooks, ribbons, bows, hats, scarves, magnets, zippers, sound parts, and small fabric props can all add value, but each also adds production steps and checking needs.
Accessories should have a purpose. A keyring turns a mini plush into a daily carry item. A lobster clasp makes a bag charm easier to attach. A ribbon can add gift feeling. A scarf can support a seasonal theme. A magnet can turn the plush into a display item. A sound part can create interaction. But if an accessory does not improve use, story, or presentation, it may only add cost and risk.
| Accessory | Value Added | Review Needed |
|---|---|---|
| Keyring | Carry function | Loop strength and hanging angle |
| Lobster clasp | Better attachment to bags | Weight, scratch risk, metal finish |
| Ball chain | Lightweight hanging option | Small-part review and durability |
| Ribbon or bow | Gift or seasonal feeling | Shape after packing |
| Hat | Character identity | Fit and seam control |
| Scarf | Outfit detail | Position and bulk |
| Magnet | Display function | Placement and safety review |
| Zipper | Functional or decorative detail | Sewing accuracy |
| Sound part | Interactive experience | Space, weight, and testing needs |
Accessories can change the plush’s balance. A heavy clasp may make a small plush tilt forward. A bow may cover the face if placed too high. A hat may bend in a tight box. A long scarf may hide embroidery. A zipper may make a small body stiff. These issues should be checked in the sample and package together.
Accessory planning should include:
- Attachment method
- Pull strength expectation
- Placement
- Material finish
- Weight
- Age-related review
- Package fit
- Scratch risk
- Bulk checking method
For character plush, an accessory should support recognition. If the character is known for a star badge, that badge deserves careful planning. If a tiny belt buckle is barely visible, it may be better as embroidery, printing, or package artwork. The strongest accessory plan keeps the design clean and usable.
How Do Colors Stay Consistent?
Colors stay consistent when artwork colors, fabric references, thread colors, print samples, accessories, packaging, and approved samples are reviewed together. Plush color is not the same as screen color. Fabric pile, thread texture, print method, light angle, and material batch can all change how a color appears.
A character may have a specific pink, blue, brown, yellow, or red in the artwork. The plush version must translate that color into real fabric and thread. A color that looks bright on screen may look softer on fabric. A dark fabric may hide black embroidery. Long pile fabric may look lighter or darker depending on direction. Printed details may appear different on short-pile fabric than on smoother fabric.
| Color Area | What To Control | Why It Matters |
|---|---|---|
| Main fabric | Color, pile direction, batch consistency | Controls overall character look |
| Embroidery thread | Eye, mouth, blush, symbol color | Protects expression |
| Printed detail | Color clarity and edge sharpness | Protects patterns and graphics |
| Applique fabric | Color match with body fabric | Keeps detail clean |
| Accessories | Ribbon, patch, clasp, label color | Affects visual harmony |
| Packaging | Artwork color and plush color match | Improves presentation |
| Multi-style set | Shared color logic | Keeps collection consistent |
Color matching should happen early. If a specific color is critical, provide a clear reference. This can be a color code, physical sample, previous product, or approved artwork. Physical review is especially helpful because fabric and thread do not always behave like digital color.
Color consistency is especially important for character series. If five plush characters belong to one collection, the colors should feel balanced. One style should not look dull while another looks premium. Shared fabric families, controlled thread choices, and approved sample records help keep the set stable.
A practical color review should check:
| Color Check | What To Review |
|---|---|
| Fabric under natural light | Does it still match the character? |
| Thread on real fabric | Does the face stand out clearly? |
| Print sample | Are edges and tones acceptable? |
| Contrast | Can small details be seen? |
| Package match | Does the plush look right with its card or box? |
| Repeat order risk | Can the material be sourced again? |
Color is emotional. A slightly wrong shade can make a character feel unfamiliar. Good color control protects the character before bulk work begins.
How Do Sample, Price, And MOQ Work?

Sample, price, and MOQ work as one connected system. The sample proves whether the character can become a real plush product. The price reflects size, fabric, structure, craft, accessories, packaging, labels, quantity, testing needs, and timing. MOQ supports the setup work needed for custom plush development and stable bulk delivery.
A character plush should not be priced only from one picture. A front image can start early review, but real cost depends on many physical details. A 20cm simple mascot and a 20cm full-body character with hair, jacket, shoes, tail, embroidered face, hangtag, and gift box are not the same project. They may share the same height, but they do not share the same structure, craft time, package work, or checking needs.
For Heyzizi custom plush projects, standard MOQ starts from 500 pieces per design. Samples usually require a sample fee because sample development may include pattern work, material preparation, embroidery or printing setup, cutting, sewing, stuffing, shaping, accessories, package review, and revision. When a single-style bulk order reaches 2,000 pieces, the sample fee can be refunded or deducted.
A practical price review should look at the full project, not only the plush body:
| Review Area | What It Affects |
|---|---|
| Artwork clarity | Reduces guessing and sample revision |
| Target size | Controls detail space, fabric use, filling, and package fit |
| Plush type | Keychain, mascot, full-body plush, blind box plush, pillow plush |
| Body structure | Head size, limbs, tail, ears, hair, posture |
| Fabric | Touch, color, pile direction, cost, repeat availability |
| Face craft | Embroidery, printing, applique, mixed craft |
| Accessories | Keyring, clasp, ribbon, magnet, zipper, sound part |
| Packaging | Polybag, hangtag, blind box, gift box, display box |
| Labels | Care label, warning label, barcode, SKU label, FNSKU label |
| Quantity | Quantity per design and total order size |
| Region and use | Testing and label review |
| Timing | Sample schedule, revision space, bulk delivery, shipping method |
The strongest project plan confirms the sample before large-volume work begins. This protects the character’s face, fabric, filling, shape, accessories, and package fit. It also gives the production team a physical reference for bulk work, which is much safer than relying only on digital artwork or written notes.
How To Make A Custom Plush Toy?
To make a custom plush toy, the project should move through artwork review, size planning, structure review, material selection, craft planning, sample development, sample revision, approved sample confirmation, bulk production, QC, packaging, and shipment preparation. Each step turns the character from visual idea into a physical product.
A clean process can look like this:
| Step | Main Work | What Should Be Confirmed |
|---|---|---|
| 1 | Artwork review | Character identity, views, key features, missing details |
| 2 | Size planning | Height, width, depth, use scene, package fit |
| 3 | Structure review | Head, body, limbs, tail, ears, hair, posture |
| 4 | Material planning | Main fabric, filling, thread, accessories |
| 5 | Craft planning | Embroidery, print, applique, patches, woven label |
| 6 | Sample making | Pattern, cutting, sewing, stuffing, shaping |
| 7 | Sample revision | Face, proportion, color, body fullness, details |
| 8 | Approved sample | Final reference for bulk work |
| 9 | Bulk work | Material, cutting, sewing, filling, checking |
| 10 | Packing and delivery | Labels, hangtags, boxes, cartons, shipment prep |
A custom plush toy usually becomes better when the project team starts with priorities. The most important is not “Can every detail be copied?” It is “Which details make this character recognizable?” A mascot may need bold eyes, a round body, and clean color. An original character may need a certain hairstyle, scarf, tail, or expression. A collectible plush series may need consistent size and package fit across all styles.
After priorities are clear, the rest can be planned around them. Tiny details can be enlarged, embroidered, printed, simplified, or moved to a tag. A narrow tail can be thickened. A complex outfit can become printed or appliqued. A flat drawing can become a sitting, standing, lying, or hanging plush.
The approved sample is the most important checkpoint. It should confirm not only cuteness, but also size, fabric, color, stitching, filling, accessory placement, label position, and package fit. Once approved, it becomes the physical standard for the full order.
How Long Does A Plush Sample Take?
Plush sample timing depends on artwork clarity, product size, body structure, fabric preparation, embroidery or print setup, accessories, packaging, and revision rounds. Many custom plush samples are reviewed around 7–14 days for first development, while revision work often needs extra time depending on the changes.
A simple plush head or mascot shape can move faster because the pattern is cleaner, fabric use is simpler, and there are fewer small parts. A full-body character with hair, clothing, tail, shoes, embroidered face, keyring hardware, custom hangtag, and box review needs more time. A multi-style collection needs even more planning because each design may require its own pattern, face craft, material, and package record.
| Sample Factor | How It Affects Timing |
|---|---|
| Clear artwork | Faster review and fewer assumptions |
| Missing views | More discussion before pattern work |
| Complex body | More pattern and sewing checks |
| Many colors | More material and cutting preparation |
| Dense embroidery | More file setup and sample testing |
| Printing | Artwork, color, and fabric surface review |
| Accessories | Sourcing, attachment, and strength check |
| Packaging | Box fit, card layout, label position |
| Revision rounds | Adds time after first sample review |
A good sample review should not be rushed only to hit a date. If the eyes are wrong, the whole character feels wrong. If the body is too flat, the plush feels weak. If the package is too tight, the ears or face may deform. If a keyring loop is weak, the product may fail after use. These are much easier to fix during sampling than after the full order is packed.
Useful feedback makes revision faster. Instead of saying “make it cuter,” stronger notes include: “move the eyes 3mm wider,” “make the mouth lower,” “increase head fullness,” “shorten the tail,” “make ears thicker,” or “move the label to the back seam.” Specific comments reduce repeated changes and help the sample reach approval with less confusion.
What Does A Sample Check?
A plush sample checks whether the character art works as a real soft product. It confirms shape, size, fabric, color, face details, filling, sewing, accessories, labels, packaging, and overall character recognition. For bulk orders, the sample also becomes the standard for production and QC.
A sample should be reviewed from the front, side, back, close-up, and package view. The front confirms the expression. The side confirms depth and posture. The back confirms tail, hair, clothing, and label placement. Close-up photos confirm embroidery, printing, seams, and material. Package testing confirms whether the plush can be packed without damage.
| Sample Check | What To Review |
|---|---|
| Front view | Face, eyes, mouth, expression, first impression |
| Side view | Body depth, snout, belly, posture, tail angle |
| Back view | Rear color, hair, tail, clothing, label position |
| Size | Height, width, thickness, package fit |
| Fabric | Touch, color, pile direction, stretch |
| Filling | Softness, fullness, balance, recovery |
| Embroidery | Thread color, stitch density, placement |
| Printing | Color clarity, edge quality, surface result |
| Sewing | Seam strength, curve smoothness, symmetry |
| Accessories | Loop, ring, clasp, bow, magnet, zipper |
| Labels | Care label, warning label, barcode, SKU position |
| Packaging | Polybag, tag, box, insert, carton fit |
For character plush, facial accuracy deserves the most attention. A few millimeters can change the mood. Eye distance, mouth height, eyebrow angle, blush position, and nose size all affect personality. A sample may be well sewn but still fail if the expression does not match the original character.
The sample also reveals cost and production risks. If a tail is too thin, it may twist in bulk. If a hat is too small, it may be hard to sew neatly. If embroidery is too dense, the face may feel stiff. If a box presses the plush too tightly, the product may arrive flattened. These issues should be solved before approval.
An approved sample should be kept as a physical reference. Photos and notes are helpful, but the real sample gives the clearest standard for hand feel, stuffing, face placement, and overall shape.
How Much Do Custom Character Plush Toys Cost?
Custom character plush toys cost different amounts because each project has its own size, fabric, body structure, face craft, accessories, packaging, labels, quantity, testing needs, and timing. A simple mascot plush and a detailed full-body character can have very different costs, even if they share the same height.
Cost usually rises when the plush includes more development work, more fabric colors, more embroidery, specialty fabric, clothing, small parts, hardware, custom packaging, multiple SKUs, or special label requirements. Cost can be controlled when the project keeps the important character features strong and simplifies details that do not add much visible value.
| Cost Driver | Lower-Cost Direction | Higher-Cost Direction |
|---|---|---|
| Size | Small to medium simple body | Larger size or thick body |
| Shape | Round, simple, few parts | Full-body, limbs, hair, tail, pose |
| Fabric | One or two standard fabrics | Several fabrics or specialty texture |
| Face craft | Simple embroidery | Dense embroidery or mixed craft |
| Clothing | Printed or stitched lines | Separate fabric clothes |
| Accessories | None or simple loop | Metal clasp, magnet, zipper, sound part |
| Packaging | Polybag or hangtag | Blind box, gift box, display box |
| Labels | Basic care label | Barcode, SKU, FNSKU, warning labels |
| SKU count | One design | Multi-style series |
| Timeline | Normal planning | Tight schedule with less revision space |
A practical cost plan should divide the plush into four parts:
| Budget Area | Included Items |
|---|---|
| Product body | Fabric, filling, sewing, shaping |
| Character detail | Embroidery, print, applique, patches, accessories |
| Presentation | Hangtag, polybag, blind box, gift box, display carton |
| Control work | Sample, revisions, labels, QC, carton planning |
This makes cost easier to manage. If the budget is tight, the team can decide where to adjust. A tiny logo may move from plush body to hangtag. Separate clothing may become embroidery or print. A gift box may become a hangtag plus polybag. A multi-style launch may start with fewer stronger characters.
The best cost plan protects what people notice first: face, shape, color, softness, and clean finish. Cutting the wrong detail can make the plush feel generic. Simplifying the right detail can keep the character strong while making bulk work smoother.
How Does MOQ Affect The Project?
MOQ affects the project because each custom plush design needs setup work before bulk production can begin. Pattern development, material preparation, embroidery or printing files, cutting setup, sample review, labels, packaging, and QC records all require time. When quantity is too low, each piece carries more setup pressure.
For Heyzizi custom plush projects, standard MOQ starts from 500 pieces per design. This means a multi-character project should be planned by quantity per design, not only total quantity. One style with 2,500 pieces is not the same as five styles with 500 pieces each. Each style may need its own pattern, embroidery file, fabric colors, labels, packaging records, and inspection focus.
| MOQ Factor | What It Affects |
|---|---|
| Quantity per design | Setup sharing and unit cost pressure |
| Number of styles | Sample, pattern, label, and package records |
| Fabric use | Material planning and color consistency |
| Embroidery setup | File preparation and face testing |
| Packaging format | Box, card, barcode, SKU label planning |
| QC planning | Style separation and bulk consistency |
| Reorder potential | Material and sample record value |
MOQ also affects launch strategy. A project with too many designs at the beginning may create higher setup pressure and more complex packing. A focused first release with fewer strong characters can be easier to control. More styles can be added later after the approved samples, material references, and package structure are clear.
A simple launch plan may look like this:
| Launch Plan | Better For | Watch Area |
|---|---|---|
| 1 design × 1,000 pcs | Mascot, event plush, gift item | Keep design strong and package clear |
| 3 designs × 500 pcs | Small character set | Control fabric and SKU labels |
| 5 designs × 500 pcs | Collectible series | More samples and packing records |
| 1 design × 2,000 pcs | Larger single-style program | Sample fee deduction may apply |
| 6+ designs | Blind box or IP series | Needs strong SKU and package control |
MOQ should not be viewed only as a number. It is part of the structure that supports stable custom plush development. The right MOQ plan helps the project move from artwork to approved sample, then from sample to finished order with fewer surprises.
How Does A Factory Control Bulk Production?

A factory controls bulk production by turning the approved sample into clear production records, then checking fabric, embroidery, sewing, filling, shape, accessories, labels, packaging, carton marks, and shipment preparation step by step. For character plush toys, the goal is not only quantity. The goal is keeping the character recognizable across every piece.
Bulk work is where character plush projects become serious. A sample may look great on its own, but the full order needs repeated accuracy. The face cannot drift. The ears cannot change shape from carton to carton. The tail cannot be attached at random angles. The body filling cannot be soft in one batch and stiff in another. Packaging cannot mix styles, barcodes, or color versions. Small mistakes become expensive when repeated across hundreds or thousands of pieces.
Character plush production needs more control than plain plush shapes because the design carries identity. A small change in eye distance can change the mood. A different thread color can weaken recognition. A lower filling level can make the character look tired. A wrong tag can create warehouse confusion. This is why a proper bulk process should start from an approved sample, not from loose artwork or verbal notes.
A strong bulk control plan usually includes:
| Control Area | What It Protects |
|---|---|
| Approved sample | Size, shape, face, fabric, filling, and details |
| Pattern record | Cutting shape and body proportion |
| Material record | Fabric type, color, pile direction, thread color |
| Craft record | Embroidery, printing, applique, patch placement |
| Accessory record | Ring, hook, ribbon, magnet, zipper, sound part |
| Label record | Care label, warning label, barcode, SKU label |
| Packing record | Polybag, hangtag, box, insert card, carton rule |
| QC checkpoints | Defect control before packing |
| Needle detection | Safety-related production control |
| Shipment record | Carton marks, quantity, packing list, delivery support |
The approved sample should become the physical standard for bulk work. Photos are helpful, but photos alone are not enough. Plush fabric, face position, filling level, hand feel, and shape are easier to judge with the actual sample in hand.
For character plush, bulk control should protect three things: recognition, consistency, and delivery readiness. Recognition means the plush still feels like the original character. Consistency means the order looks stable from piece to piece. Delivery readiness means the product is packed, labeled, and sorted in a way that supports the next stage.
What Company Turns Drawings Into Stuffed Animals?
A company that turns drawings into stuffed animals should understand both artwork translation and plush production. It should be able to review the drawing, identify key character features, adjust the 2D art for soft 3D structure, make samples, revise details, control bulk production, and plan packaging, labels, and shipment requirements.
The right partner is not simply a sewing workshop. Character plush needs design interpretation, pattern ability, material knowledge, craft planning, production control, and quality checking. A good team should tell you when a detail is easy, when it is risky, and when a better method may protect the character more effectively.
A useful evaluation checklist:
| Evaluation Item | Why It Matters |
|---|---|
| Plush pattern skill | Turns flat art into stable 3D shape |
| Character review ability | Protects face, color, posture, and identity |
| Material knowledge | Matches touch, color, texture, and body shape |
| Craft options | Supports embroidery, print, applique, patches, accessories |
| Sample revision process | Helps improve face, shape, and package fit |
| MOQ clarity | Prevents confusion in multi-style projects |
| QC system | Protects bulk consistency |
| Testing support | Helps when region, age group, or channel requires review |
| Packaging support | Connects plush, label, box, and carton planning |
| IP privacy awareness | Protects original character files and artwork |
For larger custom plush projects, scale also matters. A company with stronger pattern, sample, production, and QC resources is usually better prepared for character programs with several SKUs, packaging versions, label rules, and repeat orders.
Heyzizi works on custom plush toys, character plush, mascot plush, plush keychains, bag charms, blind box plush, collectible plush, and multi-SKU plush programs. Its confirmed production base includes 600+ staff, 35+ pattern makers, 80 QC inspectors, 30+ production lines, and around 18,000㎡ of production space. Those numbers matter most when the project needs not only a nice sample, but also stable bulk delivery.
What Is The Bulk Plush Process?
The bulk plush process begins after the approved sample is confirmed. The main stages include order review, material preparation, cutting, embroidery or printing, sewing, stuffing, shaping, in-line checking, final inspection, needle detection, packing, carton preparation, and shipment support.
A character plush bulk process should not feel like guesswork. Each stage should follow the approved sample and production records. The pattern guides cutting. The embroidery file guides face work. The material record guides fabric and thread. The packing file guides labels, bags, cards, boxes, and carton marks.
| Stage | Main Work | What Should Be Controlled |
|---|---|---|
| Order review | Confirm design, size, quantity, style list | Avoid missing details |
| Material prep | Fabric, filling, thread, accessories | Color, hand feel, availability |
| Cutting | Cut fabric pieces by pattern | Size, direction, waste control |
| Embroidery / print | Create face, logo, markings | Placement, clarity, color |
| Sewing | Join body parts and details | Seam strength, curves, symmetry |
| Stuffing | Fill head, body, limbs, tail | Fullness, softness, balance |
| Shaping | Adjust ears, face, posture, body | Character accuracy |
| In-line check | Review work during production | Catch issues early |
| Final check | Inspect finished plush before packing | Reduce defects |
| Needle detection | Production safety control | Shipment readiness |
| Packing | Add label, tag, bag, box, carton | SKU and package accuracy |
| Shipment prep | Carton marks, packing list, photos | Clear handover |
For character plush, the face usually needs the strictest attention. If embroidery placement shifts, the character can look unfamiliar. If stuffing changes the cheek or head shape, the expression may change. If fabric pile direction is inconsistent, colors may look uneven. This is why checking during production is more valuable than waiting until everything is finished.
Bulk production should also respect SKU logic. A collection may include different characters, colors, expressions, hidden styles, or packaging versions. Each SKU needs clear records. Without good separation, styles can be mixed during packing, and the cost of sorting later can be high.
How Does QC Protect Character Accuracy?
QC protects character accuracy by checking whether bulk production stays close to the approved sample in face, shape, fabric, color, filling, sewing, accessories, labels, packaging, and carton rules. For character plush, QC is not only defect checking. It is identity protection.
A regular plush defect may be a loose thread or open seam. A character plush defect can be more subtle. The eye may be too high. The mouth may tilt. The blush may be too dark. The body may be too flat. The ears may not stand the same way. The tail may be attached too low. The scarf may cover the face. These problems may not break the plush, but they can weaken the character.
Important QC checks include:
| QC Area | What To Check |
|---|---|
| Face | Eye distance, mouth shape, nose size, expression |
| Embroidery | Thread color, stitch density, placement, loose thread |
| Fabric | Color, pile direction, stains, surface damage |
| Sewing | Open seam, skipped stitch, uneven curve |
| Filling | Softness, fullness, lump control, body balance |
| Shape | Head, ears, limbs, tail, sitting or hanging angle |
| Accessories | Ring, clasp, ribbon, magnet, zipper, loop strength |
| Labels | Care label, warning label, barcode, SKU label |
| Packaging | Correct bag, tag, box, insert card |
| Carton | Quantity, style, carton mark, packing list |
| Needle detection | Safety-related control before shipment |
The strongest QC happens in stages. Material should be checked before cutting. Embroidery should be checked before sewing. Sewing should be checked before stuffing is completed. Finished plush should be checked before packing. Packed goods should be checked before shipment preparation.
For multi-SKU character programs, QC should also check style separation. A wrong barcode, wrong hangtag, wrong insert card, or wrong carton mark can create serious problems after delivery. A plush that looks perfect but enters the wrong package still creates a project risk.
Character accuracy depends on small controls. A 2mm face shift may matter. A slightly softer head may matter. A color that looks different under natural light may matter. QC protects these details before they become large-order problems.
How Are Labels And Packaging Planned?
Labels and packaging are planned by reviewing the product type, sales channel, target region, age group, SKU structure, storage needs, and final presentation. For character plush toys, packaging is not just protection. It affects first impression, barcode control, SKU separation, carton volume, and delivery accuracy.
A mini plush keychain may need a hangtag or header card. A blind box plush may need a printed box, insert card, and style-control rules. A mascot plush may need a care label and polybag. A premium gift plush may need a box, sleeve, tissue, or display insert. A retail program may need barcode labels, carton marks, and packing lists. An e-commerce program may need FNSKU or warehouse labels.
| Packaging Type | Better Use | Planning Focus |
|---|---|---|
| Polybag | Basic protection | Clean packing and size control |
| Hangtag | Retail, gift, mascot identity | Artwork, hole position, attachment |
| Header card | Keychains and bag charms | Hanging display and barcode area |
| Insert card | Story, collection, care note | Box fit and print content |
| Blind box | Mystery or collectible plush | SKU control and box size |
| Gift box | Premium plush or campaign gift | Face visibility and protection |
| Display box | Multi-style retail set | Style arrangement and carton planning |
| Carton mark | Bulk shipment and warehouse | Quantity, SKU, destination details |
Labels should be planned early because label position can affect appearance and function. A large care label on a tiny plush may look messy. A label near a keychain loop may affect hanging balance. A barcode sticker on the wrong side of a box may not scan easily. A blind box label may reveal a hidden style if placed carelessly.
A packaging review should check:
- Does the plush fit without being crushed?
- Is the face visible or protected?
- Will ears, tail, hair, or accessories bend in the package?
- Does the package match the product’s value level?
- Are barcode and SKU labels readable?
- Can warehouse teams identify cartons easily?
- Does the carton quantity make shipping efficient?
- Can the package style support repeat orders?
Good packaging keeps the plush clean, protects its shape, supports presentation, and reduces mistakes after delivery. It should be reviewed with the plush sample, not added at the last minute.
How Are IP Files Protected?
IP files are protected through careful file handling, limited internal access, project-specific communication, sample privacy awareness, and clear agreement on what can or cannot be shown publicly. For character plush projects, artwork often carries commercial value, so privacy should be discussed before development begins.
Character art may belong to a game, book, animation, mascot program, entertainment property, influencer brand, educational product, or retail collection. These files may include unreleased characters, seasonal designs, hidden styles, limited editions, or licensed images. A responsible development process should respect ownership and avoid unauthorized use.
Useful privacy practices include:
| Privacy Area | Practical Control |
|---|---|
| Artwork files | Use only for project development |
| Internal access | Share only with related project staff |
| Sample photos | Avoid public sharing without permission |
| Hidden styles | Keep SKU details separated and controlled |
| Licensed characters | Confirm authorization before production |
| NDA needs | Discuss before sharing sensitive files |
| Reorder records | Keep approved sample and material references secure |
| Public case display | Use only with approval |
IP protection is also about correct project boundaries. A factory should not encourage copying unauthorized characters. If the design is based on a licensed image, the project team should have proper rights or authorization. This protects both sides and reduces legal risk.
For unreleased collections, sample photos should be handled carefully. A hidden blind box style, campaign mascot, or new character design should not appear in public materials without approval. The same care should apply to packaging artwork, labels, and carton photos if they reveal confidential plans.
A good plush partner should help turn character art into a physical product while respecting the value of the original design.
Closing
Turning character art into custom character plush toys is not a simple copy-and-sew task. It is a product translation process. The drawing must become a soft 3D object with real size, thickness, fabric, embroidery, filling, seams, labels, packaging, QC standards, and shipping preparation. The best plush version keeps the character’s identity while making it practical to sample, revise, produce, pack, and repeat.
For a smooth project, prepare clear artwork, a target size, quantity per design, must-keep features, preferred plush type, packaging needs, label requirements, and delivery timing. If the artwork is incomplete, the project can still begin, but missing views and structure notes should be discussed before sampling.
The most successful character plush projects usually follow a simple rule: protect what people recognize first, simplify what creates unnecessary production pressure, and confirm everything important in the approved sample. Face, color, shape, softness, and presentation should work together. Small details should support the character, not overload it.
Heyzizi can review custom character plush toys, mascot plush, OC plushie projects, plush keychains, bag charms, blind box plush, collectible plush, and multi-SKU plush programs. To start a practical review, send artwork, size target, quantity per design, fabric direction, packaging needs, target region, and delivery timing to info@heyzizi.com.